
45xx Modular Disk Subsystem Manual for G-Series Releases
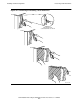
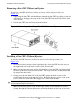
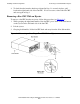
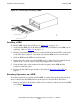
Table Of Contents
- What’s New in This Manual
- About This Manual
- 1 Introduction
- 2 Installing and Configuring the 6760 Adapter
- 3 Checking Hardware Operation
- 4 Installing and Removing CRUs
- Glossary
- Index

Installing and Removing CRUs
45xx Modular Disk Subsystem Manual for G-Series Releases—142466
4-6
Installing a 45xx Disk Drive
Installing a 45xx Disk Drive
Follow this procedure to install a 45xx disk drive in a slot in a 45xx disk module:
1. Holding the ejector of the disk drive to be installed in the open position, insert the
disk drive into the slot and slide the disk drive to the rear of the slot.
2. Push down on the ejector so that the ejector engages the top of the slot. (This action
also presses the connector into position at the back of the drive.) If you want to lock
the ejector, use the pentagonal key (turn clockwise to lock).
The green power-on LED of the disk drive should light shortly after the disk drive is
inserted into the slot. If the green power-on LED does not light after several minutes,
contact your service provider.
You are now ready to resume operations with this disk drive. Next, follow the procedure
in the following topic Resuming Operations on a 45xx Disk Drive
.
Resuming Operations on a 45xx Disk Drive
The procedure for resuming operations on a 45xx disk drive depends on whether the
disk drive is mirrored or nonmirrored. If you just added a disk drive to a 45xx disk
module, follow the next procedure Resuming Operations on a Nonmirrored 45xx Disk
Drive.
Resuming Operations on a Nonmirrored 45xx Disk Drive
The procedure that follows assumes an external non-mirrored disk drive with volume
name $SPOOL (unit 4 in slot location 4).
1. If desired, use the TSM package to run offline tests on the disk drive (for details, see
the 6760 ServerNet/DA Manual).
2. Bring up the paths to the disk drive by using either the SCF START command or the
TSM package (Up action under External Disks in the Tree view).
3. Name the volume using the SCF ALTER DISK LABEL command. If you are
adding a disk drive that will be used as a Transaction Monitoring Facility (TMF)
audited volume, be sure to add it to the TMF configuration.
Notes.
•
If you are adding a disk drive to the module, then to maximize fault tolerance, add disk
drives to the slots of the module in the following order:
0, 2, 4, 6, 1, 3, 5, 7
•
You should never install both disk drives of a mirrored volume in the same 455DS module,
because it does not have redundant data paths or power supplies.
Caution. Do not attempt to turn the key more than a quarter-turn clockwise. You can break
the latch mechanism if you turn the key too far. Turn the key only until the ejector release
button is locked and you cannot release the ejector by pressing the button.