
45xx Modular Disk Subsystem Manual for G-Series Releases
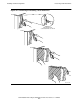
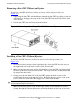
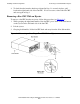
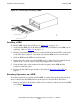
Table Of Contents
- What’s New in This Manual
- About This Manual
- 1 Introduction
- 2 Installing and Configuring the 6760 Adapter
- 3 Checking Hardware Operation
- 4 Installing and Removing CRUs
- Glossary
- Index

Installing and Removing CRUs
45xx Modular Disk Subsystem Manual for G-Series Releases—142466
4-7
Replacing a Fan CRU
4. If the disk drive you replaced was unusable, use the RESTORE utility to update the
newly installed disk drive from your latest backup. Because it was operating as a
nonmirrored disk, data written to the defective disk drive since the last backup is
lost.
5. If necessary, restart any application software that uses this disk drive.
Resuming Operations on a Mirrored 45xx Disk Drive
1. To bring up the paths to the disk drive:
a. Take the disk drive out of the hard-down state by using either the SCF RESET
DISK and START DISK commands or the TSM package (Up action under
External Disks in the Tree view).
b. The disk automatically performs a revive operation and is perfectly mirrored
when the SCF STATUS DISK command displays the disk status as STARTED.
2. There is no need to restart system software or application software; the other disk
drive of the mirrored volume was running during the replacement procedure.
Replacing a Fan CRU
This subsection describes the steps you take to replace a fan CRU in a 45xx disk
module.
Before You Start
Key points to know when replacing a fan CRU are:
What to remove or install: A fan CRU. There are two types of fan CRUs: those
with ejectors and those without ejectors. Follow the
appropriate procedures for the type of fan CRU you
are replacing in your module.
Tools you need: None.
No system shutdown needed: The fan CRU can be out of the 45xx disk module for
up to 10 minutes while the module is powered on.
Caution. Do not remove the fan CRU from a powered module for more than 10 minutes.
Without the fan CRU to circulate air past the components, the module will overheat.