
45xx Modular Disk Subsystem Manual for G-Series Releases
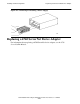

Table Of Contents
- What’s New in This Manual
- About This Manual
- 1 Introduction
- 2 Installing and Configuring the 6760 Adapter
- 3 Checking Hardware Operation
- 4 Installing and Removing CRUs
- Glossary
- Index
Installing and Removing CRUs
45xx Modular Disk Subsystem Manual for G-Series Releases—142466
4-14
Removing a Power Supply
Removing a Power Supply
To remove a power supply, follow these steps (see Figure 4-6 and Figure 1-5 on
page 1-9):
1. Remove the fan CRU from the module as described in Replacing a Fan CRU
on
page 4-7.
2. Power off the power supply to be removed by pushing the ON/OFF switch on the
power supply to the OFF position.
3. Unlatch the power supply by sliding its AC power cord retainer toward the center of
the module.
4. Disconnect the AC power cord from the power supply.
5. Pull on the AC power cord retainer to remove the power supply from the module.
Installing a Power Supply
To install a power supply, follow this procedure (see Figure 4-6 and Figure 1-5 on
page 1-9):
1. Hold the power supply so that it is oriented with the AC power cord retainer toward
the outside of the module.
2. Insert the power supply all the way into the module slot.
3. Connect the AC power cord to the power supply.
4. Latch the power supply by sliding its AC power cord retainer toward the side of the
45xx disk module.
5. Power on the power supply by pressing the ON/OFF switch on the power supply to
the ON position.
6. Replace the fan CRU in the module as described in Replacing a Fan CRU
on
page 4-7.
Note. If you are removing the only power supply in a 455DS disk module, you must first stop
all applications that are using the disk drives in that module.
Caution. Do not remove the fan CRU from a powered module for more than 10 minutes.
Without the fan CRU to circulate air past the components, the module will overheat.