
5190/5194 Modular Tape Subsystem Manual


Installing the Modular Tape Subsystem
5190/5194 Modular Tape Subsystem Manual—426878-002
3-43
Checking and Setting the Device ID
9. To change the device ID, press START to increment the ID counter to the device ID
value you want to use. The counter increments from 0 through 7, but you must
use only device ID 4 or 5.
ADR:5
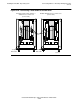
For a module containing two tape drive CRUs attached to one 3216 controller
(NonStop Himalaya K-series servers only), always set the device ID for the drive
CRU located on the left (as you face the front of the module) to 5. Set the device
ID of the drive CRU on the right to 4. See Figure 3-1 on page 3-6 for a diagram
showing this arrangement.
10. Press TEST to set the new device ID. The message panel displays:
1:END
11. Press START repeatedly until the following message displays:
Z:WTNVR
12. Press TEST to display the confirmation message for writing the new device ID to
NVRAM.
WTNVR: N
13. Press START to change N to Y (yes).
WTNVR: Y
14. Press TEST to store the new device ID in NVRAM. The message panel shows:
B:END
15. Press the SHIFT and RESET buttons simultaneously to end the procedure. The
message panel shows:
SEL MTC
16. Press RESET to restart the drive. The drive or ACL performs self-test diagnostics
and shows the following messages, after which the message panel displays an
asterisk (*).
UNLOADNG...
SELFTEST
17. Replace the cartridge magazine in the ACL.
If the drive or ACL front panel returns an error message after you perform this
procedure, press the RESET button and repeat the procedure. If you continue to get
an error message, cycle the power and repeat the procedure. Contact your service
provider if you are unable to clear the message.