
5257/5257 ACL Installation and User's Guide for NonStop S-Series Tape Enclosures


Installing and Configuring the 5257ACL Tape Drive
5257/5257ACL Installation and User's Guide for NonStop Himalaya S-Series Tape Enclosures—522344-001
5-3
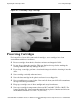
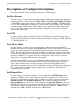
Powering on the Tape Drive
PoweringontheTapeDrive
1. Attach the male end of the power cord to a power outlet.
2. Press the power switch on the tape drive.
3. Verify that the tape drive powers on.
Configuring the 5257ACL Tape Drive
For information on the different menu's and submenu's featured on the 5257ACL Tape
drive, see Section 6, “Operating the 5257ACL Tape Drive.”
The 5257ACL library controller is factory set to SCSI ID 3; the 5257ACL drive is
factory set to SCSI ID 5, unless otherwise specified. The drive is factory set for parity
generation, and checking is enabled.
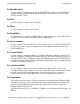
Setting the SCSI ID
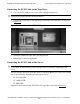
1. Turn the 5257ACL on. Wait until the power-on self-test terminates and the default
screen appears. Figure 5-2 shows the default screen for the unit, which indicates a
tape magazine with only one cartridge in slot 1. Rectangles will apper on line three
on the default screen in positions that correspond to the slots where cartridges are
present.
2. At the Default Screen, press Enter. The Main Menu in Figure 5-3
appears.
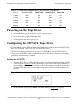
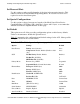
Table 5-1. Connections Supported for 5257/5257ACL Tape Drives
Server ServerNet / DA IOMF CRU IOMF 2 CRU PMF CRU
S7000 YES NO NO NO
S7400 YES NO YES NO
S70000 YES NO YES NO
S72000 YES NO YES NO
S74000 YES NO YES YES
Figure 5-2. Default Screen