
5525B/31/32 Line Matrix Printer IGP/PGL Programmer's Reference Manual


Creating a Logo
227
Creating a Logo
1. Use your system commands to open a file for the logo program with the
filename HNDLGO.FOM. For example:
Enter Format
HNDLGO.FOM (System Format)
2. Input the Special Function Control Code and Logo mode command to put
the IGP/PGL in the Create Logo mode. Include HAND as the logo name;
specify a vertical length (
VL
) of 56 (column length) and a horizontal length
(
HL
) of 60 (row length).
Enter Format
~LOGO;HAND;56;60 (cc)LOGO;
logoname;VL;HL
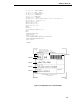
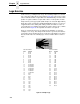
3. Enter each row of dot positions as tabulated from the grid and shown in
Figure 50. The format is Row;Column (for example, 15;13-29;36-51).
Each row is entered on a separate line. After all the dot positions are
entered, terminate the Create Logo mode by entering an End command
line.
4. Use the Special Function Control Code and Create command to create a
form with the form name LEFTHAND. To add the logo to the form, input a
Create Form mode Logo Call command, identify the logo starting row
(
SR
) 45 and starting column (
SC
) 33, and specify the logo to use by its
name (HAND). Stop the Logo command and end the Create Form mode.
Enter Format
~CREATE;LEFTHAND (cc)CREATE;[/]
formname
[
;FL
]
LOGO LOGO
45;33;HAND
SR;SC;logoname
STOP STOP
END END
5. Input the Special Function Control Code and Execute command for the
LEFTHAND form just created. Input a blank line, the Special Function
Control Code, and the Normal command to instruct the IGP/PGL to return
to the Normal mode after execution.
Enter Format
~EXECUTE;LEFTHAND (cc)EXECUTE;
formname
[;PAGE
n
]
[
;FC
]
~NORMAL (cc)NORMAL
6. Use system commands to exit the HNDLGO.FOM file and print. The
finished program and logo should look like the following sample. If error
messages occur, refer to “Solving Program Errors” on page 238
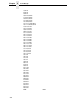
~LOGO;HAND;56;60
1;40-42
2;38-42
3;36-42
4;35-42
5;33-41
6;31-40
7;30-38
8;29-36
9;28-35
10;27-34;52-54