
5525B/31/32 Line Matrix Printer PrintNet User's Manual

Chapter 3 Windows PrintNet Configuration
24
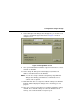
11. Press the ENTER key to make the selection. An asterisk appears to
the right of the value.
12. Press the UP arrow key and you will be returned to step 8.
13. When you are finished changing parameters, exit the configuration
menus and lock the ENTER key. (Refer to your printer’s
User’s
Manual
for details.)
Configuration Using IP Assign
NOTE: You must have the TCP/IP protocol and services enabled on this
windows station first.
To configure an IP address and subnet mask on your PrintNet:
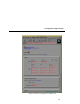
1. Insert the diskette labeled “IPAssign” into the floppy drive.
2. Load the File Manager or WinFile and look under the floppy drive for
an IPAssign self-extracting file.
3. Double click on the IPAssign file to launch the install program.
4. When prompted to install, click on YES to load the InstallShield
Wizard.
5. Answer the prompts throughout the wizard.
6. Once the install process is complete, you will be prompted to view the
“ReadMe” file. Select “Yes” to read this. Close the file when done.
7. Find the new IPAssign program group and double click on the
“IPAssign” icon to load the program.
NOTE: IPAssign will search the network to find the correct device. This
may take several minutes. For larger networks, you may speed
the process by powering the printer off and then on again.