
5525B/31/32 Line Matrix Printer User's Manual
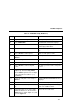
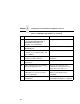
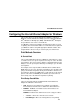
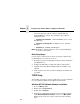
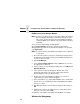
Table Of Contents
- 1 Introduction
- 2 Setting Up the Printer
- 3 Operating the Printer
- 4 The Configuration Menus
- Configuration Overview
- CONFIG. CONTROL
- ACTIVE EMULATION
- EMULATION
- PCL-II Emulation
- LinePrinter Plus Emulations
- Optional Emulations
- PCL-II Emulation
- LinePrinter Plus Emulation
- P-Series Emulation
- Proprinter XL Emulation
- Epson FX Emulation
- IGP/PGL Submenu
- Features
- Configuring the Emulation with the Control Panel
- Define CR Code (Carriage Return)
- Define LF Code (Line Feed)
- Autowrap
- Select SFCC
- PI Slew Range
- CR Edit
- Select Font
- Select LPI
- Auto Uppercase
- Skip Command Prefix
- Power On IGP/PGL
- Extended Execute Copy
- UPC Descenders
- Compressed CPI
- Ignore Character
- IGP100 Compatbl.
- Optimized Ratio
- IGP/VGL Emulation
- MAINT / MISC
- HOST INTERFACE
- ETHERNET PARAMETERS
- PRINTER CONTROL
- DIAGNOSTICS
- RIBBONMINDER
- 5 Interfaces
- Overview
- Dataproducts Long Line Interface
- IEEE 1284 Parallel Interface
- RS-232 and RS-422 Serial Interfaces
- Host System Configuration
- Internal Ethernet Adapter Configuration
- Configuring the Internal Ethernet Adapter for TCP/IP
- Host Software
- Compiling Host Software
- Computer-aided Configuration with ezsetup or npconfig
- Configuration Through the Network with ARP
- Configuration Through the Network with RARP
- Configuration Through the Network with BOOTP
- Restoring Factory Defaults
- Host Configuration
- Direct Printing Without Spooler
- Printing Via the Spooler
- Custom Interface Scripts
- BSD UNIX
- System V UNIX
- npd Pseudo-device Interface
- Other TCP/IP Methods
- Configuring The Internal Ethernet Adapter For Novell
- Configuring the Internal Ethernet Adapter for Windows
- 6 Troubleshooting
- A Printer Specifications
- B Downloading Firmware
- C ASCII Character Set
- D Communication and Trademark Information

NetWare 4 Options
181
Table 13. PSERVER Setup (NetWare 4)
Step Action Result of Action
1. Log in to Novell as supervisor. Gives you supervisor rights.
2. Enter PCONSOLE. PCONSOLE’s Main Menu displays.
3. Press F4. Puts you into bindery emulation mode
and displays Main Menu.
4. Select PRINT QUEUES. List of currently defined queues comes
up.
5. Press <Insert> to add a queue. Asks for new queue’s name.
6. Type in this new name and press
<Enter>.
New queue is added to list.
7. Press <Escape>. Returns to PCONSOLE’s Main Menu.
8. Select PRINT SERVERS. A list of existing print servers displays.
9. Press <Insert> to add a new print
server.
Prompts you for the name of the print
server.
10. Type the name of the Internal Ethernet
Adapter. By default, it is M_
xxxxxx
where
xxxxxx
equals the last six digits
of the unit’s Ethernet address. (e.g.
M_000BF5)
This new server is added to the list.
11. Select this new print server and press
<Enter >.
PRINT SERVER INFORMATION menu
displays.
12. Select PRINTERS. A list of defined printers comes up.
13. Press <Insert> to add a printer to the
list.
Prompts you for the printer name, type,
and some additional fields.
14. Type in the name of one of the eight
default destinations on the unit for the
Name field (e.g. d1prn, d2prn, etc.) and
go to the Type field.
Cursor moves to this field.