
ATM Adapter Installation and Support Guide


Installing an ATM3SA Adapter
ATM Adapter Installation and Support Guide—420013-002
2-6
Gather the Proper Tools
Gather the Proper Tools
You will need the following tools to replace an adapter:
Review Standard Operating Practices
Standard operating practices include the following:
•
Work in an electrostatic discharge (ESD) protected environment.
•
Remove all metal accessories before working with electrical equipment.
•
Restrain any dangling items that could get caught in equipment.
•
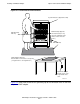
Obtain an ESD protection kit and follow the directions that come with the kit.
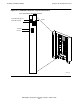
Figure 2-4 on page 2-8 illustrates an ESD protected environment.
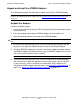
Install the ATM3SA Adapter
It is easiest to install the hardware first, and then add the adapter using the Subsystem
Control Facility (SCF). The following text describes how to install, configure, and start
the ATM3SA adapter.
Follow Table 2-3, Installation Checklist.
Tool Used to. . .
Electrostatic discharge
(ESD) wriststrap with
grounding clip
Protect the adapter from damage caused by
electrostatic discharge.
Antistatic mat
(recommended)
Provide a static-free environment for removal and
installation of an adapter.
Flashlight Check the connectors for bent or broken pins.
Note. An ESD protection kit can be purchased from HP using part number T99247-A00
Table 2-3. Installation Checklist
Step Description Comment
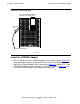
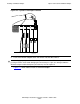
1. Unpack and Install the ATM3SA Adapter
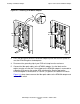
2. Check the Installation of the ATM3SA
Adapter
3. Use SCF to Add the ATM3SA Adapter This step is the major difference
between removal and replacement.
4. Configure and Start the Communications
Lines