
ATM Transaction Anayzer User and Installation Guide


Working with HP NonStop ATM Transaction Analyzer 78
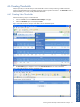
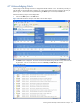
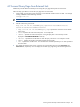
4. You can use the Edit Display Fields link to select the fields from the selected Query table, which will be used
for specifying the filtering criteria. Clicking on the link displays the Query Display Fields page. By default
five fields will be displayed in the selected list box after adding a new table.
Figure 4-32 Query Display Fields Page
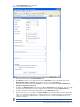
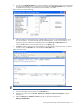
5. Select the field(s) to be displayed from the available fields box and move to the selected fields box using
the > and >> buttons. To remove the fields from the selected fields box, use the < and << buttons. To
change the sequence of fields in the selected fields box use the Move Up and Move Down buttons.
Click on the OK button to save the changes and return to the Query page.
6. The Filter drop-down list box in Query page enables you to select the filter criteria to be used. To create a
new filter, click on the New Filter link. This displays the Query Filter area.
Figure 4-33 Query Page
NOTE: To modify an already configured filter, select it from the Filter list and use the Filter Detail link.
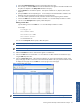
7. Specify a meaningful name for the filter in the Filter Name box.
8. Select the security for the filter as Private, Read access to Everyone or All access to Everyone using the
Security box.
9. Select the Filter Type as Standard or Custom using the corresponding drop-down box.
Defining a Standard Filter