
DCE Installation, Configuration, and Management Guide


Configuring NonStop DCE
HP NonStop DCE Installation, Configuration, and Management Guide—429552-005
4-11
Configuring Additional Servers
where the characters shown in parentheses are the default response if you press
Return.
4. Enter the Guardian user ID permitted to administer NonStop DCE on this system.
See Being the DCE Privuser on page 6-3 for information on which user is
permitted to perform specific dce_config actions.
The user ID you enter must be a member of the super group.
If you do not enter the super ID, dce_config stops and you must log in as the
specified ID to complete DCED endpoint mapper configuration. For example, if you
specify SUPER.DCE, you must perform these additional steps:
a. Use the exit command to stop the OSS shell.
b. Log in again as the DCE privuser SUPER.DCE.
c. Repeat the procedure described in Setting Up an Initial DCE Cell on page 4-4.
d. Repeat Steps 1 through 4 of this procedure.
The DCED databases are created, and the DCE demon dced is started in endpoint
mapper mode.
You can now continue as described in Configuring Additional Servers.
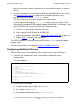
Configuring Additional Servers
After the initial servers are configured, you can add servers to each virtual host:
1. From the DCE configuration menu, select option 2 (Additional Server
Configuration).
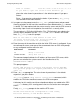
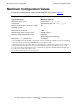
This menu appears:
2. Use this menu to configure:
•
A global directory agent (GDA) server (gdad)
•
An auditing server (auditd)
•
A password management server (pwd_strengthd)
Additional Server Configuration ( on hostname )
1. Additional CDS Server(s)
2. DTS
3. GDA Server
4. Replica Security Server
5. Auditing
6. Password Management Server
7. Unconfigure Password Management Server
98. Return to previous menus
99. Exit
selection: