
DSM/SCM User's Guide
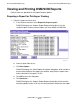

Generating DSM/SCM Reports
DSM/SCM User’s Guide — 529846-014
18 - 9
Viewing a Report Online
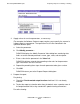
a. Check the Viewable formatted file subvolume location check box if it is not
already checked.
b. To write the report to a location other than the default, enter a subvolume name
in the subvolume location field, using standard HP naming conventions:
If the host and target systems are network connected, the output location
for target reports can be on the host system, the target system, or another
system connected to both systems.
If the target system is not network connected to the host, the output
location can be on the target system or another DSM/SCM system
connected to it.
4. Schedule the request.
a. To change the default scheduling, click Scheduling; then schedule when to
format the report for online viewing. See Submitting a Request on page 16-2.
The default is to prepare the report immediately.
b. Click OK.
The report is prepared and formatted for online viewing, printing, or both, as
scheduled. If it is prepared for online viewing, it is also added to the list of
prepared reports.
5. Click OK to submit the Prepare Report request.
Viewing a Report Online
You can view only one report of a given type at a time. To view multiple reports of the
same type, send them to the spooler or disk and view them in multiple windows using
your terminal emulator package.
To view a report online:
1. After the Prepare Report request is completed, select File>View prepared
document
s.... DSM/SCM displays a list of reports and documents that have been
prepared for online viewing.
2. Select the report from the list; then click View. DSM/SCM displays the selected
report.
Note. The entire report runs twice (thus taking longer) if both the Print formatted output
location and the Viewable formatted file subvolume location check boxes are selected.
Note. Reports formatted for viewing online are deleted from the list o
f viewable prepared
documents at the end of the request retention period specified in the Configuration Manager
profile. However, they remain in the subvolume they were written to. You must manually purge
them from the subvolume.