
DSM/SCM User's Guide


DSM/SCM Differences
DSM/SCM User’s Guide — 529846-014
B - 3
Upgrading to DSM/SCM T6031G02
Upgrading to DSM/SCM T6031G02
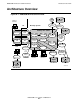
To manage an Integrity NonStop target from a NonStop S-series host system, you must
install the DSM/SCM G02/H02 planner interface on your PC and the T6031G02 on the
NonStop S-series system. A new version of SWID is also required. For more
information, see the softdoc.
Task 1: Install the DSM/SCM G02/H02 Planner Interface
Task 1.1: Copy Setup to your PC
1. On the host system, make ZDSMSCM the current subvolume:
> VOLUME $volume.ZDSMSCM
2. Using IXF or a similar method, perform a binary copy of the ZDSMEXE file from
the ZDSMSCM subvolume on the host to a subdirectory called \DSMSCM on the
PC. The subdirectory can be on any drive with sufficient space.
3. On your PC, rename the PC file to ZDSM.EXE.
4. Double-click the ZDSM.EXE file. The DSM/SCM files you just transferred to your
PC are decompressed.
Task 1.2: Run Setup.exe
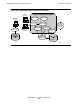
1. In the Contents column, double-click Setup.exe. Setup displays the Enter Object
Manager Server Class screen, with the default OM-001.
2. Click OK. Setu
p displays the Enter CNFGINFO Process Name screen, with the
default $ZPHC.
3. Click OK. Setup displays the AskOption screen.
4. Click the Winsock radio button; then click OK. Setup displays the Ask Path
screen, with the default WINSOCK.DLL path name C:\WINNT\SYSTEM32.
5. Click OK. Setup displays the IP Address screen.
6. Enter the IP address for your system; then click OK. Setup displays the IP Port
screen.
7. Enter the port number you saved for DSM/SCM; then click OK. Setup asks for the
name of the host system.
8. Enter the system name; then click OK. Setup asks if you want to run DSM/SCM
now.
9. Indicate that you want to run DSM/SCM now.
Note. After you run ZDSM.EXE, you can delete it to save space. All other files are
required for proper DSM/SCM operation.