
Fast Ethernet Adapter Installation and Support Guide


Replacing an FESA
Fast Ethernet Adapter Installation and Support Guide—425685-003
3-2
Prepare to Replace an FESA
Prepare to Replace an FESA
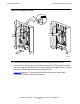
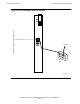
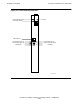
FESAs can be installed in slots 53 and 54 of a processor enclosure and in slots 51, 52,
53, and 54 of an I/O enclosure. See Figure 3-2 on page 3-19. When no FESA is
installed in a slot, a ServerNet adapter filler panel occupies the empty slot. (Therefore,
a ServerNet adapter filler panel can possibly occupy slots 53 and 54 of a processor
enclosure or slots 51 through 54 of an I/O enclosure.) The filler panel maintains proper
air flow and reduces electromagnetic interference (EMI).
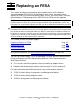
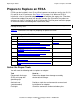
Table 3-1 summarizes the steps for preparing to replace an FESA.
Gather the Proper Tools
You will need the following tools to replace an adapter:
Note. FESAs (including FESA connections via S-series I/O enclosures) are not supported on
NonStop BladeSystems.
Table 3-1. Preparation Checklist
Step Description Comments
1.
Gather the Proper Tools.
2.
Print the FESA Planning Worksheet. Figure 3-1
3.
Identify Any Communications Lines and ServerNet
Wide Area Network (SWAN) Using the FESA.
4.
Redirect or Stop Any Customer Applications Using
the FESA.
5.
Stop the Communications Lines and SWAN
Concentrator Line Using the FESA.
6.
Determine the Physical Location of the FESA.
7.
Abort the FESA.
8.
Label the Communications Cables Connected to the
FESA.
Tool Used to. . .
Electrostatic discharge
(ESD) wriststrap with
grounding clip
Protect the adapter from damage caused by
electrostatic discharge.
Antistatic mat
(recommended)
Provide a static-free environment for removal and
installation of an adapter.
Flashlight Check the connectors for bent or broken pins.