
Flow Map Manual


Installing Flow Map on the PC
Installing and Running Flow Map
2–4 098935 Tandem Computers Incorporated
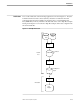
2. Transfer the FLOWMAP file from the ISV to the PC as a binary file using any
method you wish. Name it FLOWMAP.EXE.
FLOWMAP.EXE should now reside in your C:\FLOWMAP directory.
3. Execute FLOWMAP.EXE. To do this, either:
Double-click on FLOWMAP.EXE in the File Manager, or
Select FLOWMAP.EXE and choose Run from the File menu.
Flow Map expands to several files. See the AAREADME file for a complete list.
You will only use the following files for the rest of your setup procedure and
during normal operation:
FLOWMAP.XLM Flow Map application Excel Macro sheet
FLOWMAP.ICO Flow Map program item icon file
FLOWDEMO.FMH Demonstration Flow Map Host sample file
VPROC.XLM Excel Macro sheet that displays the version of Flow Map
PC product and data files
After these product files have expanded, you can back up FLOWMAP.EXE in case
you need to reinstall the Flow Map PC product files at a future time. You can then
delete FLOWMAP.EXE from the C:\FLOWMAP directory to save disk space.
4. Create a Flow Map data directory to hold Flow Map Host samples and Flow Map
flow diagrams. This manual assumes the Flow Map data directory is a
subdirectory of C:\FLOWMAP named C:\FLOWMAP\DATA.
5. Add a program item for Flow Map PC to the Windows Program Manager:
Select a program group in which to install the Flow Map program item, or
Create a new group by selecting New from the Program Manager File menu.
6. In the Program Item Properties dialog box that displays:
a. Enter Flow Map in the Description box.
b. Enter C:\FLOWMAP\FLOWMAP.XLM in the Command Line box.
c. Enter the name of a Flow Map data directory for storing Flow Map Host
samples and flow diagrams in the Working Directory box.
d. Enter a shortcut key or leave None in the Shortcut Key box.