
G06.24 Software Installation and Upgrade Guide

Backing Out the DSM/SCM Revision
G06.24 Software Installation and Upgrade Guide—528593-005
14-6
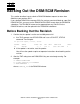
Submit a Backout Request
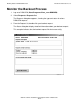
A complete set of operator instructions might look like this:
DSM Software Configuration Manager Backout - Complete Backout
==============================================================================
\ELI Prior snapshot 2002-04-14:18:03:03
DEFAULT Last S/W applied on SYS on 2000-04-14:18:01
Print operator instructions on:
==============================================================================
Placement of files for this Backout is complete. To activate the software
that has been placed follow the operator instructions displayed below.
===============================================================================
Activation Instructions for \ELI DEFAULT
These are general instructions that were determined from configuration
attributes. Refer to the release documentation for detailed information
on migrating to this software configuration.
1. Stop all applications.
2. PUP REPLACEBOOT $<SYS00 VOLUME NAME>, $<SYS00 VOLUME NAME>.SYS00.SYSDISC
OR for S-Series:
SCF CONTROL DISK $<SYS00 VOLUME NAME>,
REPLACEBOOT $<SYS00 VOLUME NAME>.SYSNN.SYSDISC
3. Update FIRMWARE.
Run TMDS (or TSM for S-Series) to check firmware and perform
firmware updates.
T1089 S-SERIES SP FW includes firmware changes.
T1067 ISP1000 CODE includes firmware changes.
T8461 S7000 PROM MILLICODE includes firmware changes.
T7892 S70000 BOOT MILLICOD includes firmware changes.
4. RUN ZDSMSCM.ZPHIRNM SYS00
(Note: replace nn with correct number)
5. Check for $0 EMS messages.
Correct any errors indicated in the $0 EMS messages.
Do not proceed until this step has been successfully completed.
6. Coldload is required.
7. Restart all applications.
==============================================================================
F4-Show Messages
F9-Print operator instructions F15-Help F16-Return SF16-Exit
Task completed successfully.
5. Enter a printer location and press F9 to print the operator instructions. You might
need to modify these instructions before returning to the previous RVU. For
instance, you might not need to change the firmware unless you have to replace
hardware that can be supported only by the new RVU.
6. Press SF16 to exit the Target Interface.