
G06.27 Software Installation and Upgrade Guide


Updating Service Processor (SP) Firmware
G06.27 Software Installation and Upgrade Guide—540067-001
7-26
Verifying the SP Firmware Update (Using OSM)
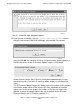
You are then asked to reset each SP:
The firmware update needs to reset the Service Processor
to activate the updated firmware. Would you like to
reset the Service Processor?
7. Click Yes.
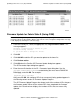
The Reset Progress bar keeps track of the number of SPs that pass the firmware
reset. After a few minutes, the SP is reset. When all the selected SPs have
completed the reset, the Passed column displays the number that are successfully
reset. (A green checkmark replaces the grey checkmark by the SP under
Resource Name.)
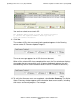
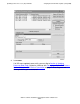
After the firmware update is complete and the SPs reset, the Compare State
displays Up-rev and the firmware Version displays the new firmware file (such as
T1089^25MAR04^09MAR04^ABM):
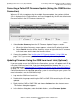
Verifying the SP Firmware Update (Using OSM)
1. In the OSM Service Connection, double-click the group containing the PMF or
IOMF CRU containing the SP whose status you want to verify.
2. Right click the SP. Select Attributes.
The Compare State should display Up-rev.
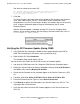
You can also use the OSM Low Level Link to verify the firmware update:
1. Log on to the OSM Low-Level Link. (Keep the OSM Service Connection open.)
2. Display the Service Processor Actions dialog box, either by clicking SP Actions in
the toolbar or by selecting Display>SP Actions.
3. Check that the firmware version and date appear in the Service Processors (SPs)
list.
4. If desired, click either Select all X Fabric SPs or Select all Y Fabric SPs.
5. From the Firmware Version Type list, select Service Processor.
6. Click Refresh to update the information in the Service Processors (SP) list. This
step might take several minutes.
7. Verify that the correct version of SP firmware appears in the Service Processors
(SPs) list: