
G06.28 Software Installation and Upgrade Guide

Installing the Latest DSM/SCM SPRs and Client
Software
G06.28 Software Installation and Upgrade Guide—541688-001
B-17
Copy the ZDSMSCM Client File From the Host
Copy the ZDSMSCM Client File From the Host
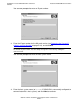
1. If you are using OutsideView, start an OutsideView session.
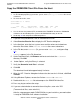
2. Select Session>Receive file to display the IXF Receive dialog box.
3. In the Host box, enter the host system name and the volume and subvolume
where the file resides. Make $volume.ZDSMSCM the current subvolume.
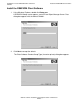
4. In the File box, enter zdsmexe. (Or, you can enter zdsm.exe, and ignore Step
10.)
zdsmexe appears in the File Name box.
5. Under Download Path, click Browse and locate and select the c:\dsmscm
directory. Click OK.
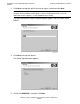
6. Under Options, verify that Binary is selected.
7. Verify that Overwrite local files is selected.
8. Click OK.
The download should take approximately 2 minutes.
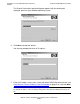
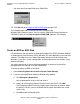
9. When the IXF - Receive dialog box indicates that the transfer is finished, click End
Transfer.
10. Using Windows Explorer, rename the file from zdsmexe to zdsm.exe.
11. Double-click the zdsm.exe file to decompress the DSM/SCM client files.
12. Press any key to continue the setup.
13. If you are asked whether to overwrite the existing files, enter Y for YES.
(To overwrite all files, enter A for ALL.)
After the setup program copies DSM/SCM files to your hard drive, your workstation
is ready for DSM/SCM client software installation.
Note. If you are not using OutsideView on the PC that manages DSM/SCM:
1. On the NonStop operating system host system, make $
dsmscm_vol.ZDSMSCM the current
subvolume.
2. To check for the file, enter:
$DSM ZDSMSCM 86> fi zdsmexe
$DSM.ZDSMSCM
CODE EOF LAST MODIFIED OWNER RWEP PExt SExt
ZDSMEXE 0 2079732 23DEC2004 2:19 255,255 NUNU 4 28
3. Use the file transfer protocol (FTP) to download the ZDSMEXE file from the ZDSMSCM
subvolume on the NonStop host system to the DSMSCM directory on the PC.
4. Go to Step 10
and complete the download process.