
G06.29 Software Installation and Upgrade Guide


Installing the G06.29 RVU
G06.29 Software Installation and Upgrade Guide—542744-003
5-21
Print Operator Instructions From the Target Interface
(ZPHITI)
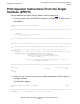
4. In the Selection number field, enter the number corresponding to the logical target
to which you applied the software (selection 2 in this example), and press F1 to
display the Target Menu - Select Action screen.
DSM Software Configuration Manager Target Menu - Select
Action
=============================================================================
=
\WARRIOR Prior snapshot 2002-11-20:12:18:44
DEFAULT Last S/W applied on SYS 00 on 2002-11-22:12:17
Selection number:
=============================================================================
=
Choose an action by entering the selection number of an item from the list
below.
=============================================================================
=
1 Perform/Review apply request
2 Perform backout to S/W Applied on SYS 01 on 2000-09-13:15:44
3 Review operator instructions for the last apply completed.
=============================================================================
=
F1-Select
F15-Help F16-Return SF16-
Exit
Ready
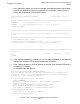
5. Enter 3 (Review operator instructions for the last apply completed) in the Selection
number field, and press F1 to display the operator instructions.
6. Enter a printer location in the Print operator instructions field, and press F9 to print
the operator instructions.
An example might look like this:
Activation Instructions for \WARRIOR DEFAULT
These are general instructions that were determined from configuration
attributes. Refer to the release documentation for detailed information
on migrating to this software configuration.
1. Stop all applications. Keep OSS running.
2. Update FIRMWARE.
Run TMDS (or TSM for S-Series) to check firmware and perform
firmware updates.
T7892 S70000 BOOT MILLICOD includes firmware changes.
T1089 S-SERIES SP FW includes firmware changes.
T0480 ISP1040 DOWNLOAD COD includes firmware changes.
3. RUN ZDSMSCM.ZPHIRNM SYSnn
(Note: replace nn with correct number)
4. Check for $0 EMS messages.