
Gigabit Ethernet ServerNet Adapter Installation and Support Guide


Replacing a GESA
Gigabit Ethernet Adapter Installation and Support Guide—523628.005
3-2
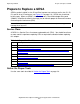
Prepare to Replace a GESA
Prepare to Replace a GESA
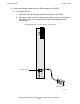
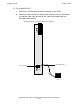
GESAs can be installed in slots 53 and 54 of a processor enclosure and in slots 51, 52,
53, and 54 of an I/O enclosure (see Figure 2-1 on page 2-4). GESA slots should not
be left empty. When no GESA is installed in a slot, a ServerNet adapter filler panel
(U09021) should be installed in the empty slot to maintain proper air flow and to reduce
electromagnetic interference (EMI).
Service Class
A GESA is a Service Class-2 customer-replaceable unit (CRU). You should have three
or more months’ experience replacing CRUs or equivalent education before replacing
this adapter.
Gather the Proper Tools
Use the same tools described in Gather the Proper Tools on page 2-6.
Note. GESAs (including GESA connections via S-series I/O enclosures) are not supported on
NonStop Blade Systems.
Table 3-1. Preparation Checklist
Step Description
1.
Gather the Proper Tools.
2.
Print the GESA Planning Worksheet.
3.
Identify Any Communications Lines and ServerNet Wide Area Network (SWAN)
Using the GESA.
4.
Redirect or Stop Any Customer Applications Using the GESA.
5.
Abort the communications lines..
6.
Determine the Physical Location of the GESA.
7.
Abort the GESA.
8.
Label the Communication Cable Connected to the GESA.