
Integrating NonStop JDBC Type 4 Driver With IBM WebSphere Applications
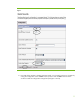
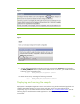


Table 6. Entering the JNDI names for the BankWAR module.
Referrence Binding JNDI name
ejb/accountController ejb/AccountControllerEJB
ejb/customerController ejb/CustomerControllerEJB
ejb/txController ejb/TxControllerEJB
Figure 10
8. In Step 5 you are required to map resource references in the EJB to a SQL data source. Here,
because you intend to use NonStop SQL/MX Database on NonStop systems as your database,
you change the JNDI Name values of all the entries to jdbc/DukesDB (see “Configuring a data
source for the new JDBC provider” section). Once this is done, click Next to proceed to Step 6.
9. Select the default values in Step 6 and proceed to the next step by clicking the Next button.
Select the default values in Step 7 and proceed to the next step by clicking the Next button.
10. In Step 8 you will map security roles defined in the Duke’s Bank Application to users/groups in
the WebSphere Application Server environment. To do this, you will rely on the file-based
security that you enabled in the “Enabling security” section. As a result, you should select both
the checkboxes in the All Authenticated? column and press Next.
11. Step 9 provides a summary of the installation options. Pressing Finish begins the deployment of
the Duke’s Bank Application.
12. The WebSphere Application Server workbench starts the deployment process and displays the
status in the browser. This process may last for a few minutes, depending on the system
resources present in the target machine. At the end of the deployment, you should see a screen
similar to figure 11.
14