
Integrating NonStop JDBC Type 4 Driver With IBM WebSphere Applications


5
Starting the NonStop ODBC/MX Service
The NonStop ODBC/MX Service must be installed and running on the NonStop system. Check the
NonStop ODBC/MX Service, also known as NonStop SQL/MX Connectivity Services (MXCS;
T7969G10), manual documentation on how to start the MXCS Association Server.
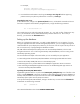
The following is a quick reference to start the MXCS Association Server from the TACL command
prompt as a super.super user:
<volume>.<subvolume>.mxoas /name $<process name>,
nowait, term $zhome/ -pn <port>
Example:
$data08.A2040209.mxoas /name $vn, nowait, term $zhome/ -pn 6100
Note: The above TACL command must be issued from an audited disk volume.
Copying the t4sqlmx.jar file
This Type 4 Driver class is part of the t4sqlmx.jar
file and has to be made available to the
WebSphere Application Server environment at runtime.
To do this,
• Create a new directory named “nonstop” in the WSAS_HOME folder, if required.
• Copy the TYPE4_HOME/lib/t4sqlmx.jar file to the WSAS_HOME/nonstop directory.
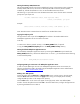
Starting the default WebSphere Application Server
Start the default WebSphere Application Server by executing the startServer script located in the
WSAS_HOME/bin directory. Because the default server is “server1”, you should execute the following
on the command prompt:
C:\> {WSAS_HOME}/bin/startServer server1
Configuring JDBC Type 4 Data Source for WebSphere Application Server
In order to use the JDBC Type 4 Driver in the WebSphere Application Server environment, the
following configurations need to be made using the WebSphere Application Server administration
Web console (
http://localhost:9090/admin).
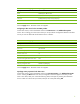
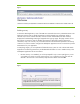
Adding a new JDBC provider
On the left panel, select the Resources Æ JDBC Providers option. On the screen in the right panel,
select the Server radio button and click the Apply button. Doing so will display all the currently
configured JDBC providers on the sample server (server1).
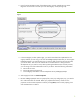
Click the New button. A new screen will appear on the right panel. Select “User-defined JDBC
Provider” from the drop-down list and click OK. In the screen that follows, configure the Type 4 Driver
by entering the details shown in table 2.