
iTP Secure WebServer System Administrator's Guide (iTPWebSvr 5.1+)


Configuring the iTP Secure WebServer
iTP Secure WebServer System Administrator’s Guide—522659-001
7-58
The WebSafe2 Configuration File
Using an Existing WID Server Class
If the server class you want to use for the WID already exists outside the iTP Secure
WebServer’s Pathway system, you can comment out the Server line and use the name
of the server class you want in the
-websafe option of the AcceptSecureTransport
directive. The syntax for this option is
-webSafe [pathmon_name:] serverclass_name
where:
pathmon_name
is the name of a PATHMON process. The PATHMON process you specify must run
on the same node as the iTP Secure WebServer environment.
serverclass_name
is the name of the server class. The WID server class must be started for the iTP
Secure WebServer environment to use it.
Starting Multiple WID Processes
A WID process can use only one WISP, but multiple WID processes can use the same
WISP. Furthermore, a WID process can service only one SSL request at a time. If your
iTP Secure WebServer configuration has more than one WISP, or if you anticipate
multiple concurrent SSL sessions, you should define multiple processes in the WID
server class for optimal performance. Use the Numstatic attribute in the Server
directive or through the PATHCOM interface to specify the number of processes in the
WID server class as follows:
Numstatic number
where:
number
specifies the number of processes in the WID server class. Specify a value from 1 to
4095.
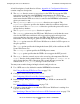
Here is an example of how the
Numstatic command can be used:
Server $(root)/bin/wid {
eval $DefaultServerAttributes
Arglist $(root)/conf/wid.config
Numstatic 2
The value of Numstatic cannot exceed the value of Maxservers.
The values of Maxlinks and Linkdepth cannot be greater than 1.
Caution. If the owner of the WID server class you specify is different from that of the WebSafe
Server class, the iTP Secure WebServer cannot communicate with the WID server class.