
iTP Secure WebServer System Administrator's Guide (iTPWebSvr 6.0+)

Using the Resource Locator Service (RLS)
iTP Secure WebServer System Administrator’s Guide—523346-002
10-5
Modifying the Database
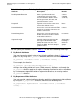
Example
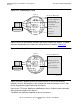
In the following example, the prefixes /WEB and /Images will cause invocation of the
web server whose domain name is net.myco.com. Similarly the prefixes /samples
and /index1.html will cause invocation of the web server at IP address
172.16.10.22. RLS will use a different TCP/IP process to reach each server. The prefix
/MlplSrvs can cause invocation of either of two web servers, whichever RLS
predicts will offer better response time. In this case, the web servers are both on the
same system (as indicated by their common IP address).
insert into =dbaccess values ("/WEB","net.myco.com",80,"$ztc2",1,2);
insert into =dbaccess values ("/Images","net.myco.com",80,"$ztc2",1,1);
insert into =dbaccess values ("/samples","172.16.10.22",3366,"$ztc0",1,0);
insert into =dbaccess values ("/index.html","172.16.10.22”,3366,"$ztc0",1,3);
insert into =dbaccess values ("/MlplSrvs","172.16.10.22",3376,"$ztc0",2,4);
insert into =dbaccess values ("/MlplSrvs","172.16.10.22",3366,"$ztc0",2,5);
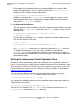
Modifying the Database
When you build and install RLS as described in Building and Installing the Resource
Locator Service (RLS) below, the make utility loads the database with the data in
dbload.sqlci, but you don’t need to reinstall RLS to make changes later. In fact, an
administrator should periodically review and update the database to ensure it reflects
any changes in web-server configurations.
To update the database without changing the locations of the database files, do the
following:
1. Update the dbload.sqlci file.
2. Use the NonStop TS/MP PATHCOM utility to stop the RLS server class.
3. Return to the OSS environment and issue the command make dbload to load your
new data into the DBACCESS table.
4. Use the PATHCOM utility to start the RLS server class.
To change the location of the database, do the following:
1. Stop the iTP Secure WebServer environment.
2. Issue the rm command in OSS to remove the file rmt.pway.
3. Issue the command make dbdelete to delete the existing database.
4. Change the values of DB_VOLUME and DB_SUBVOLUME in the make file. The
database files will be created in the Guardian volume and subvolume you specify.
5. Issue the command make to create a new rmt.pway and a new database.
6. Restart the iTP Secure WebServer environment.