
iTP Secure WebServer System Administrator's Guide (Version 7.0)


Integrating the WebSafe2 Internet Security
Processor (WISP)
iTP Secure WebServer System Administrator’s Guide—523346-012
5-5
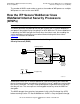
Fault-Tolerance Requirements
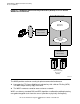
other keys. The server uses the master key to generate its SERVER-READ and
SERVER-WRITE session keys.
Fault-Tolerance Requirements
There is no automatic backup to software encryption in the event of WISP failures.
Therefore, you must install and configure enough hardware to survive a single point of
failure. The minimum recommended configuration, in addition to the local area network
(LAN) that the iTP Secure WebServer runs on, includes the following:
•
Two WISPs
•
Two LAN segments
•
Two 3615 Ethernet LAN controllers
•
Two Ethernet 4 ServerNet adapters (E4SAs) or
•
Two Token-Ring ServerNet adapters (TRSAs)
How to Integrate WebSafe2 Internet Security
Processors (WISPs)
You should add the WISP to an iTP Secure WebServer environment that has already
been operating so that you can isolate problems more easily.
If You Have Not Installed the iTP Secure WebServer
If you have not installed the iTP Secure WebServer, follow the procedures in Section 2,
Installing the iTP Secure WebServer, to prepare your system, install and configure the
software, and test it without the WISP first. Then, follow the procedures listed in the
subsection If You Are Migrating to WebSafe2 Encryption
.
If You Are Migrating to WebSafe2 Encryption
If you have already installed the iTP Secure WebServer and have been using software
encryption provided by SSL, complete the following steps to integrate a WISP into the
iTP Secure WebServer environment:
1. Install the WISP.
See Installing the WebSafe2 Internet Security Processor (WISP) on page 5-6.
2. Prepare a Distinguished Name (DN) for the certificate you will obtain.
See Preparing a Distinguished Name (DN) for the Certificate on page 5-7.
3. Install the WID software from the PAX archive.
Note. WISP is compatible only with systems running on G-series RVUs.