
Jolt 1.2 Developer's Guide


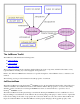

Table Of Contents
- Jolt for NonStop(TM) TUXEDO Developer's Guide
- Jolt for NonStop(TM) TUXEDO Developer's Guide
- About This Guide
- 1. Introducing Jolt
- 2. Installing Jolt
- 3. Configuring the Jolt System
- 4. Bulk Loading NonStopTM TUXEDO Services
- 5. Using the Jolt Repository Editor
- 6. Using the Jolt Class Library
- 7. Using JoltBeans
- 8. Using Servlet Connectivity for NonStopTM TUXEDO
- 9. Using Jolt 1.2 ASP Connectivity for NonStopTM TUXEDO
- A. NonStopTM TUXEDO Errors
- B. System Messages
- Index

development environment so that JoltBeans are available in the component library of your Java tool. For example, using
Symantec Visual Café, you can set the class path so that the .jar files are visible in the Component Library window of
Visual Café. You only need to set the class path of the .jar files in your development environment once. After you have
placed these .jar files in the class path of JoltBeans to the Component Library. Then you can simply drag and drop any
JoltBean directly onto a Java form on which you are developing your Jolt client application.
To set the class path in your Java development environment, follow the instructions in the product documentation for
your development environment. Navigate from the IDE of your development tool to the directory where the jolt.jar file
resides. The jolt.jar file is typically found in the directory called %TUXDIR%\udatadoj\jolt\client. The jolt.jar file
contains the main Jolt 1.2 classes. Set the class path to include these classes. The JoltBean .jar files do not need to be
added to the class path. To use them, you only need to add them as components in your development IDE.
After you have set the class path to include the Jolt 1.2 classes, you can add JoltBeans to the Component Library of your
development environment. See the documentation for your particular development environment for instructions on
populating the Component Library.
When you are ready to add JoltBeans to the Component Library of your development environment, add only the
development version of JoltBeans, as explained in Using Development and Run-time JoltBeans.
Using Development and Run-time JoltBeans
Note that the.jar files containing JoltBeans contain two version of each JoltBean, a development version and a run-time
version. The development version of each JoltBean name ends with the suffix Dev. The run-time version of each class
name ends with the suffix Rt. For example, the development version of the class JoltBean is JoltBeanDev, while the
run-time version of the same class is JoltBeanRt.
Use the development version of JoltBeans during the development process. The development JoltBeans have additional
properties that enhance development in a graphic IDE. For example, the development Beans have graphic properties
("bean information") that allow you to work with them as graphic icons in your development environment. The run-time
version of JoltBeans does not have these additional properties. You do not need the additional development properties
of the beans at run-time. The run-time beans are simply a pared down version of the development JoltBeans. Use the
development version of JoltBean class when you are developing your application in the IDE of your Java development
environment.
When you compile your application in your development environment, it is compiled using the development beans.
However, if you want to run it from a command line outside of your development environment, it is recommended that
you set the class path so that the run-time beans are used when compiling your application.
Basic Steps for Using JoltBeans
After you have added the development version of JoltBeans to the Component Library of your Java development
environment, the basic steps in using JoltBeans during development are as follows:
Drag the beans from the JoltBeans component palette of your development environment.1.
Populate the properties of the beans (see Table 7-6) and set up the event-source listener relationships between the
beans of the application or applet (you "wire" the beans together). The development tool generates the event
hook-up code.
2.
Finally, add the application logic to the event callbacks.3.
These steps are explained in more detail in the following section of this section. The JoltBeans walkthrough
demonstrates each of these steps with an example.