
Jolt 1.2 Developer's Guide


Table Of Contents
- Jolt for NonStop(TM) TUXEDO Developer's Guide
- Jolt for NonStop(TM) TUXEDO Developer's Guide
- About This Guide
- 1. Introducing Jolt
- 2. Installing Jolt
- 3. Configuring the Jolt System
- 4. Bulk Loading NonStopTM TUXEDO Services
- 5. Using the Jolt Repository Editor
- 6. Using the Jolt Class Library
- 7. Using JoltBeans
- 8. Using Servlet Connectivity for NonStopTM TUXEDO
- 9. Using Jolt 1.2 ASP Connectivity for NonStopTM TUXEDO
- A. NonStopTM TUXEDO Errors
- B. System Messages
- Index
Note
If jolt.jar and admin.jar are in the same directory as RE.html, the web server provides the classes. If they are not in the
same directory as RE.html, modify the applet code base.
Press Enter. The Repository Editor logon window displays.4.
After starting the Jolt Repository Editor, follow these directions to log on:
Type the name of the server machine designated as the access point to the NonStop
TM
TUXEDO application and select the
port number text field.
1.
Type the port number and press Enter. The system validates the server and port information.
Note
The IP address and port number you specify are the IP address (or hostname) and the port number you have configured
the JSL to listen on (using the -n switch). If you have configured Jolt Relay, the IP address and port number the JRLY is
configured to listen on can be used instead of the IP address and port number of the JSL.
2.
Type the NonStop
TM
TUXEDO Application Password and press Enter. Based on the authentication level, type the
remaining information.
3.
Type the NonStop
TM
TUXEDO user name and press Tab.4.
Type the NonStop
TM
TUXEDO user password and press Enter.
Note
The Jolt Repository Editor uses the hardcoded joltadmin for the user role.
The Packages and Services options are activated.
5.
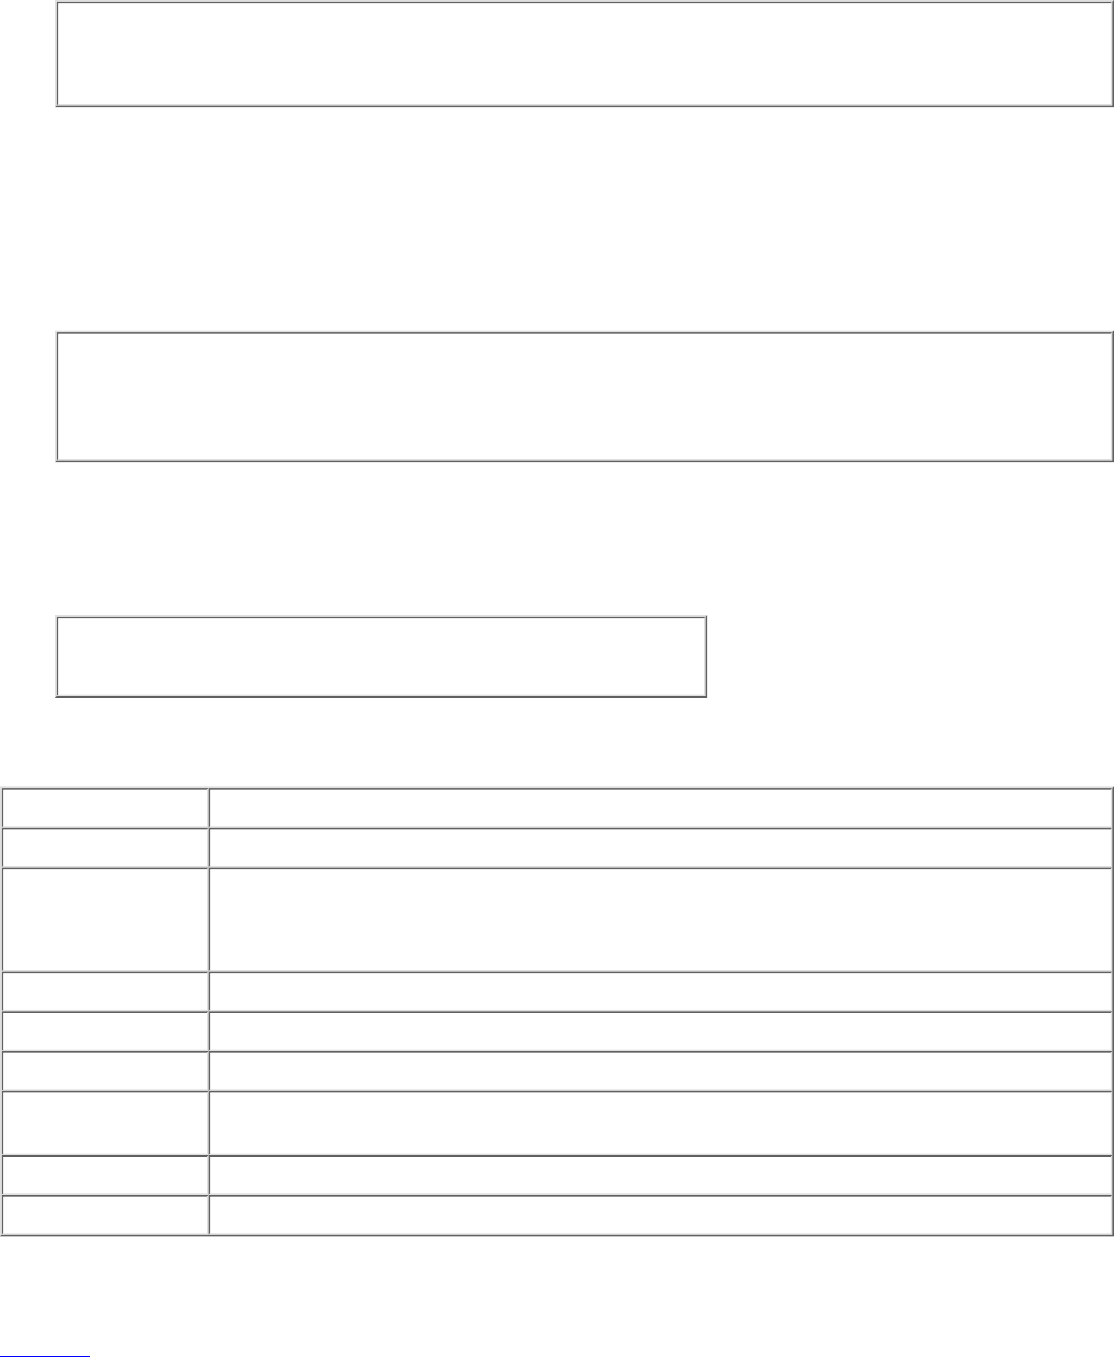
The following table details the options of the Repository Editor logon window.
Option Description
Server Type the server name.
Port Number Type the port number in decimal value.
Note: After the server name and port number are entered, the user name and password fields are
activated. Activation is based on the authentication level of the NonStop
TM
TUXEDO application.
Application Password Type the NonStop
TM
TUXEDO administrative password.
User Name Type the NonStop
TM
TUXEDO user identification. The first character must be an alpha character.
User Password Type the NonStop
TM
TUXEDO password.
User Role Type the NonStop
TM
TUXEDO user role. Required only if NonStop
TM
TUXEDO authentication level
is USER_AUTH or higher.
Packages Accesses the Packages window. (Enabled after the logon.)
Services Accesses the Services window. (Enabled after the logon.)
Exit the Repository Editor
Exit the Repository Editor when you are finished adding, editing, testing, or deleting packages, services, and parameters.
Figure 3-1 is an example of the Repository Editor window before exiting. Only Packages, Services, and Log Off are enabled.
All text entry fields are disabled.
Figure 3-1. Example of the Repository Editor Logon Window Before Exiting