
Jolt 1.2 Developer's Guide


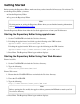

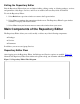
Table Of Contents
- Jolt for NonStop(TM) TUXEDO Developer's Guide
- Jolt for NonStop(TM) TUXEDO Developer's Guide
- About This Guide
- 1. Introducing Jolt
- 2. Installing Jolt
- 3. Configuring the Jolt System
- 4. Bulk Loading NonStopTM TUXEDO Services
- 5. Using the Jolt Repository Editor
- 6. Using the Jolt Class Library
- 7. Using JoltBeans
- 8. Using Servlet Connectivity for NonStopTM TUXEDO
- 9. Using Jolt 1.2 ASP Connectivity for NonStopTM TUXEDO
- A. NonStopTM TUXEDO Errors
- B. System Messages
- Index
Logging on to the Repository Editor
After starting the Jolt Repository Editor:
Type the name of the server machine designated as the access point to the NonStop
TM
TUXEDO
application and select the port number text field.
1.
Type the port number and press Enter. The system validates the server and port information.
Note
Unless you are logging on through the Jolt Relay, the same port number is used to configure the
Jolt Listener. Refer to your UBBCONFIG file for additional information.
2.
Type the NonStop
TM
TUXEDO Application Password and press Enter. Based on the
authentication level, type the remaining information.
3.
Type the NonStop
TM
TUXEDO user name and press Tab.4.
Type the NonStop
TM
TUXEDO user password and press Enter.
Note
The Jolt Repository Editor uses the hardcoded joltadmin for the user role. See the
JoltSessionClass for additional information.
5.
The Packages and Services options are activated.
Figure 5-2 is an example of the Repository Editor logon window.
Figure 5-2. Repository Editor Logon Window