
NET/MASTER Management Services (MS) System Management Guide


Adding and Maintaining Utility Definition Records
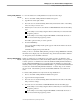
Managing Access to External Utilities and Applications
6–20 115414 NonStop NET/MASTER MS System Management Guide
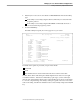
5. Press the ENTER key.
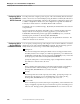
The UMS : Utility Delete Confirmation panel, shown next, displays information
about the selected utility. With the exception of the Command field, all fields on
this panel are for display only. NonStop NET/MASTER MS displays this
information to help you determine whether the utility definition to be deleted is
the one you intended to delete.
REST----------------- UMS : Utility Delete Confirmation ---------------ZUMSUDCP
Command ===> Function=DELETE
Press Enter to confirm delete, or Cancel key to cancel delete request
Utility Name ......... COLLINIT
OPSYS or PROGRUN ..... O
File/Macro Name ...... $SYSTEM.SYSTEM.COLLINIT
Startup Text .........
F1=Help F2=Split
F9=Swap F12=Cancel
6. Press the ENTER key to confirm the delete operation.
When the delete operation completes execution, NonStop NET/MASTER MS
returns you to the UMS : Utility Definition Maintenance panel and displays a
notification message on the third line of the panel. It also writes a message to the
activity log, noting that you deleted a utility definition record.
Listing All Defined Utilities To view a list of utilities defined to NonStop NET/MASTER MS, follow these steps:
1. Move to the UMS : Utility Definition Maintenance Menu panel.
2. Type L in the Select Option field.
3. If desired, move the cursor to the Enter Utility Name field and enter the name of
the utility from which the list should begin.
The field is optional for list operations: if it is used, the list of utilities begins with
the utility specified in the field; otherwise, the list begins with the first record in
the database.