
NonStop Cluster Essentials Installation and Quick Start Guide


to “Server Management,” and click the “Configure as Server” link. Click the check box next
to “localhost.” Click Run and then click OK in the confirmation dialog box.
14. In the new window, enter your Windows credentials in the form “domain\username” and
your Windows password. Click Login. Verify that the command resulted in the message
“SERVERMODE set to True.” Close the SSH window.
If the TIMESYNC server has not been configured as a persistent process, it can be configured using
NonStop Cluster Essentials.
1. Repeat Step 1 above to display the “Cluster Management Tasks” window. Expand the Kernel
Management, NonStop Server, and Subsystem Management categories.
2. Click on the Configure Subsystem Manager link.
3. Select the NonStop servers to configure. Enter the following values:
$ZZKRN.#TimeSyncProcess
$TIMEProcess Name
$SYSTEM.SYSTEM.TIMESYNCProgram Object File
5Number of Restarts
APPLICATIONStart Mode
4. Click Display Optional Parameters. Check the box next to Processor Specification and enter
a processor number. Check the box next to Home Terminal and enter $ZHOME. Click Run.
5. In the SSH session window, verify that the command did not result in an error and close the
window.
6. Click on the Start Subsystem Manager link. Enter $ZZKRN.#TimeSync for the Process field
and click Run. Verify that the command did not result in an error and close the window.
Exporting Cluster Configuration
Rather than having to create NonStop Cluster configurations on each console, a configuration can
be exported to a backup or replacement console that has HP SIM and the Cluster Essentials plug-in
already installed. It can be done either directly to the remote console, if possible, or by using
removable media to copy and then import the configuration on the other console.
NOTE: If a user is planning to export a cluster configuration to a remote Windows-based CMS
and does not know the SQL Server database user name and password for that remote CMS, that
user must be granted the necessary permissions in the SQL Server database of that remote CMS,
as described in “Granting Permissions in the SQL Server Database for a Remote CMS ” (page 31).
1. On the console from which you are exporting, launch the Configuration Management
Application, and click Export Database Configuration.
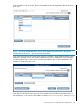
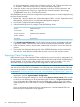
2. In the Export Configuration dialog box, choose either Export to remote console, if the console
to which you are exporting can be accessed through the network, or Export to local console,
if you must transfer the configuration file by removable media, such as CD or DVD. When
exporting between Linux and Windows consoles, the Export to local console option must be
used.
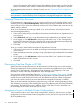
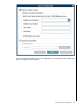
If you are exporting the cluster and server configurations to a Windows-based CMS, the
following Export Configuration screen appears:
28 Additional (Optional) Configuration