
NonStop S-Series Half-Height Serv-Side Door Read Me

1
Compaq NonStop™ Himalaya S-Series
Half-Height Service-Side Door Read Me
This card summarizes the procedure to install a half-height service-side door on a switch
enclosure:
1. Make sure that you have a Phillips screwdriver.
2. Verify that you have the following parts:
•
Adapter frame
•
Service-side door preinstalled on the adapter frame
•
4 M4 Phillips screws, plus extras
•
4 M4 KEPS nuts, plus extras
•
4-mm hexagonal wrench (to lock and unlock the door)
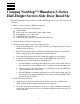
3. Remove the door from the adapter frame.
4. Install the frame on the service side of the enclosure:
a. Align the mounting hooks of the frame with the top, enlarged holes on the cable
channels of the enclosure.
b. Push the frame in and down so that the mounting hooks engage; verify that the
frame is supported by and flush against the cable channels.
c. Verify that the four frame and cable-channel mounting holes are aligned.
d. Using the four M4 Phillips screws and four M4 KEPS nuts, perform the
following steps for each of the four mounting holes:
1. Insert the Phillips screwdriver through the access hole in the frame, then use
the screwdriver to insert a Phillips screw completely into the mounting hole.
2. From the inside of the cable channel, use your fingers to install a KEPS nut
on the protruding end of that screw.
3. Insert the Phillips screwdriver through the access hole in the frame, then use
the screwdriver to tighten the Phillips screw while you hold the KEPS nut in
place with your free hand.
5. Install the service-side door:
a. Align the top, elongated mounting pin of the door with the top hinge of the
frame, then insert the mounting pin partway into that hinge.
b. Verify that the bottom mounting pin of the door is aligned with the bottom hinge
of the frame, then lower the door to seat both mounting pins and secure the door
to the enclosure.