
NonStop S-Series Hardware Installation and FastPath Guide (G06.25+)


Powering On and Starting the System
HP NonStop S-Series Hardware Installation and FastPath Guide—529443-001
8-5
Powering On the Tape Subsystem
Powering On a 519x Tape Subsystem
The power-up sequence for the 519x tape subsystem is described in detail in the
5190/5194 Modular Tape Subsystem Manual.
1. Ensure the 519x tape subsystem is installed correctly. See Installing a 519x
Cartridge Tape Subsystem on page 7-9.
2. Ensure that the AC power cord for the 519x tape subsystem is plugged into a
dedicated power receptacle, as indicated on the Floor Plan Diagram.
For every piece of equipment that has two power cords, plug each power cord into
an AC power outlet controlled by a different breaker.
3. Open the rear bezel door of the 519x module by pulling the blue-green handle at
the top. You can lower the door to a horizontal position.
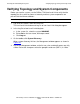
4. Set the AC power switch to the ON position. See Figure 8-2.
5. Close the rear bezel door of the 519x module.
6. If the tape subsystem includes an automatic cartridge loader (ACL), install the
cleaning cartridge in the ACL. For instructions on installing the cleaning cartridge,
see the 5190/5194 Modular Tape Subsystem Manual.
You must install the cleaning cartridge before operating the ACL. If no cleaning
cartridge is installed, a CHK F8 check code appears on the ACL front panel when
the automatic cleaning routine is activated. Failing to install the cleaning cartridge
can cause dirt buildup on the read-write head.
7. Check the tape subsystem SCSI ID using the operator buttons on the tape drive or
ACL front panel. Reset the SCSI ID, if necessary, using the operator buttons. For
information on checking and setting the SCSI ID, see the 5190/5194 Modular Tape
Subsystem Manual.
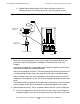
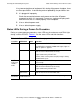
Figure 8-2. AC Power Switch for 519x Tape Drive
AC Power Switch
AC Power Cord
AC Power
Receptacle
Rear of 519x
Tape Drive
VST051.vsd