
NonStop S-Series Hardware Installation and FastPath Guide (G06.26+)


Powering On and Starting the System
HP NonStop S-Series Hardware Installation and FastPath Guide—529876-001
8-4
Powering On the Tape Subsystem
Powering On a 5175 Tape Subsystem
1. Ensure the 5175 tape subsystem is installed correctly. See Installing a 5175
Open-Reel Tape Subsystem on page 7-2.
2. Ensure that the AC power cord for the 5175 tape subsystem is plugged into a
dedicated power receptacle, as indicated on the Floor Plan Diagram.
For every piece of equipment that has two power cords, plug each power cord into
an AC power outlet controlled by a different breaker.
3. On the lower left side of the front panel, ensure the standby push-button switch is
in the out (OFF) position.
4. At the back of the 5175 module, grasp the hand hold at the top of the back panel
and pull down the back panel.
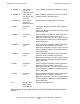
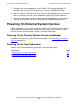
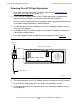
5. Press the AC power switch to apply power to the tape drive. See Figure 8-1.
6. Close the back panel of the 5175 module, pushing at the top to seat the fasteners.
7. At the front of the tape subsystem, ensure that the tape door is closed.
8. On the lower left side of the front panel, press the standby push-button switch to
the ON position.
Figure 8-1. AC Power Switch for 5175 Tape Drive
AC Power
Switch
AC Power Cord
Rear of 5175 Tape Drive
VST533.vsd