
NonStop S-Series Hardware Installation and FastPath Guide (G06.29+)


Installing Enclosures
HP NonStop S-Series Hardware Installation and FastPath Guide—541880-002
2-25
Inspect the Components
d. Reinsert the PMF CRU or IOMF CRU until the ejectors on the CRU can be
engaged into the notches on the enclosure.
e. Latch the two ejectors simultaneously by first pressing the blue-green tabs and
then closing the ejectors. This seats the CRU against the backplane.
f. Push down on the power interlock to secure the CRU in the slot.
6. Inspect all SEBs or MSEBs in the system enclosure:
a. Verify that the ejectors on each SEB or MSEB in the enclosure are latched.
b. If any ejectors are unlatched, reseat the SEB or MSEB. See Step 7.
7. To reseat each SEB or MSEB that has become improperly seated during shipping:
a. Put on your ESD wriststrap. Attach the grounding clip securely to an exposed,
unpainted metal surface such as the connector nuts on the SEB or MSEB.
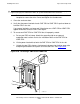
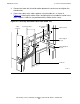
b. Unlatch the ejector by pressing the blue-green tab and pulling outward on the
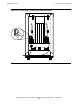
ejector to unseat the SEB or MSEB. See Figure 2-21.
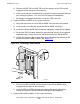
c. Reinsert the SEB or MSEB until the ejector on the SEB or MSEB can be
engaged into the notch on the enclosure.
d. Latch the SEB or MSEB ejector by pressing the blue-green tab and then
closing the ejector to seat the SEB or MSEB against the backplane.
8. Inspect all ServerNet adapters in the system enclosure:
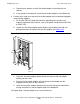
Figure 2-21. Reseating a SEB or MSEB
VST538.vsd