
NonStop S-Series Hardware Installation and FastPath Guide (G06.29+)

Installing Service-Side Doors
HP NonStop S-Series Hardware Installation and FastPath Guide—541880-002
4-3
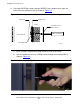
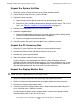
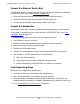
c. Pull the Phillips screwdriver back out through the access hole in the frame.
d. Use your fingers to install a KEPS nut on the protruding end of the screw,
which is in the cable channel.
e. Insert the Phillips screwdriver through the access hole in the frame.
f. Use the screwdriver to tighten the Phillips screw while you hold the KEPS nut
in place with your free hand as shown in Figure 4-3.
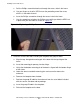
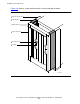
7. Install the service-side door, including the faceplate and group ID label:
a. Align the top, elongated mounting pin of the door with the top hinge of the
frame.
b. Insert that mounting pin partway into that hinge.
c. Verify that the bottom mounting pin of the door is aligned with the bottom hinge
of the frame.
d. Lower the door to seat both mounting pins and secure the door to the
enclosure.
e. Remove the faceplate from the door.
f. Retrieve the group ID label for the enclosure from the set of labels included
with the service-side door add-on package.
g. Insert the group ID label in the faceplate.
h. Reinstall the faceplate on the door.
Figure 4-3. Tightening a Phillips Screw in a Mounting Hole
VST096.vsd