
NonStop S-Series Hardware Installation and FastPath Guide (G06.29+)
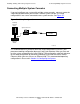


Installing, Starting, and Testing a System Console
HP NonStop S-Series Hardware Installation and FastPath Guide—541880-002
5-9
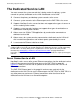
Verifying Readiness
Verifying Readiness
After you power on a system console, the console executes a set of startup hardware
diagnostics. After the OS logo appears:
1. When prompted, press Ctrl-Alt-Delete to log on.
2. A logon screen shows the user name/administrator and password blank. Leave the
password blank and click OK to complete logon.
The desktop appears, listing software applications in the form of icons.
The software on the system console hard disk has been installed to operate this
workstation for NonStop servers. This configuration must be maintained in the user
environment. Altering this configuration is not supported. Neither is loading and using
software not approved for the system console. For a list of approved software, see
Preloaded and Supported Hardware and Software on page 1-49.
If the operating system fails to load properly, see Appendix D, Troubleshooting.
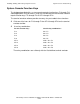
Final Setup Steps
This subsection describes the final setup steps:
Restart the System Console
1. From the Task Bar, click Start.
2. Select Shut Down.
3. Select Restart the computer.
4. Click Yes.
5. Observe the startup process again. It should be the same process described under
Verifying Readiness on page 5-9, ending with the display of application icons on
the desktop.
Action Procedure Page
Ensure the system console can be powered
down and restarted in the same condition.
Restart the System Console
5-9
If necessary, create an emergency repair disk
or automated system recovery disk.
Create an Emergency Repair Disk
(ERD) or Automated System
Recovery (ASR) Disk
5-10