
NonStop S-Series Hardware Installation and FastPath Guide (G06.29+)

Powering On and Starting the System
HP NonStop S-Series Hardware Installation and FastPath Guide—541880-002
8-9
Power-On Procedure Using AC Power Cords
3. Monitor power-on activity. These symptoms indicate that the system is powered:
•
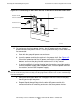
Fans on the appearance side of an enclosure start turning, and air begins to
circulate through the enclosure. Place your hand near the exhaust grill, which
is located above slots 51 through 54 on the service side, to feel for air
circulation.
If the fans do not start turning a few seconds after you power on the system,
check that the AC power cords and power-on cables are properly connected.
•
After the fans start to operate, the other system components begin to power
on. Status LEDs on the various enclosures and CRUs light during a series of
power-on self-tests (POSTs). Eventually, all components in the group 01
processor enclosure power on, and then the components in other groups
power on one after another. When the POSTs finish successfully, which can
take up to 10 minutes, the green power-on LEDs light on all CRUs. All LEDs
become lit briefly during the POSTs, but only the green power-on LEDs should
remain lit after the POSTs finish.
Ensure that the POSTs have finished successfully and that only green
power-on LEDs are lit in the system enclosures before you start the system.
See system startup procedures on 8-5.
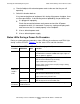
For more information about status LEDs, see Status LEDs During a Power-On
Procedure on page 8-10.
If AC power is being supplied to the system but the system still does not appear to
be powered, the system might be running internal tests. Wait several minutes (at
least 10 minutes for large configurations). If the system is still not powered on after
this time and you cannot determine the cause of the problem, contact your service
provider.
4. After all power-on tests are completed and the system is running, check the AC
power cords. Perform this test only if you have connected redundant power cords
to separate circuits. See Step 2 on page 8-8.
a. Locate the circuit breaker that controls half the power cords.
b. Switch this breaker off.
c. Check all objects with redundant power cords to be sure that they are still
operating.
d. Switch this breaker back on.
e. Locate the other circuit breaker that controls the other half of the power cords.
f. Switch this breaker off.
Caution. If the green power-on light-emitting diodes (LEDs) on the various CRUs are lit but
the fans are not turning, power off the system immediately and contact your service provider.