
NonStop S-Series Hardware Installation and FastPath Guide (G06.29+)


Troubleshooting
HP NonStop S-Series Hardware Installation and FastPath Guide—541880-002
D-41
Restoring Software on the Hard Disk
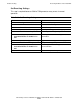
32. Verify that the Workgroup field contains
Workgroup. Click Next.
Click Finish.
The Completing Network Configuration
screen appears.
33. Click OK to restart the computer.
34. Click Properties.
Type Tandem for computer name.
Click OK twice to restart.
Click Yes to restart.
The Identification Changes Workgroup radio
button is selected.
The Network ID Screen appears.
35. Start > Settings > Control Panel The Control Panel appears.
36. Select the Modems tab.
Select Add. Click Next.
The Add/Remove Hardware Wizard and
Install New Hardware screen appears.
37. Double-click Phone and Modem. The Phone and Modem screen appears.
38. Select Don’t detect new hardware.
Click Next.
A list of manufacturers and models appears.
39. Find your modem manufacturer (should
be Multitech) and model.
If MT5634ZBA is not in the list, click
Have disk.
The Install From Disk screen appears.
40. Enter C:\Multitech or browse to find
your driver on the Installer CD.
The Install From Disk screen continues to be
displayed
41. Select 56ZBA-V. Select Open. The Install screen appears.
42. Select Install from disk. Click OK. The Install New Modem screen appears.
43. Select Multitech Systems
MT5634ZBA. Click Next.
The Select the Port screen appears.
44. Select Selected Ports.
Select Com1. Click Next.
The Modem Installation is Finished screen
appears.
45. Click Finish. The Phone and Modem screen appears.
46. Click OK. You return to the Control Panel.
47. Double-click the Network and Dialup
Connections icon.
The Dialup and Networks Screen appears
on the Network Connection Wizard.
48. Click the Make New Connection icon. The Network Connection Type appears.
49. Select Next. Options appear.
50. Select Accept incoming connections. The Devices for Incoming Connection
screen appears.
51. Select Multitech MT5634ZBA. Click
Next.
The Incoming Virtual Private Connection
screen appears.
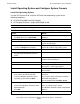
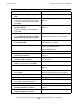
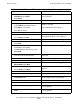
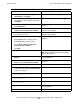
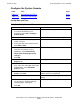
Table D-8. Install Windows XP Professional Operating System (page 3 of 4)
Action Result