
NonStop S-Series Hardware Installation and FastPath Guide (G06.29+)


FastPath Tasks: Required
HP NonStop S-Series Hardware Installation and FastPath Guide—541880-002
E-19
14. Connect Primary System Console to Ethernet
Switch
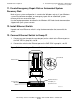
14. Connect Primary System Console to Ethernet Switch
1. Connect a cable from Ethernet switch 1 to the network interface card behind the
console.
2. Set the medium-dependent interface (MDI) switch on Ethernet switch 1 to MDI
mode. To set this switch, see the documentation provided with the Ethernet switch.
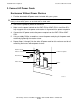
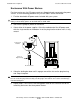
15. Install Tape Drive
Installing a 5175 Tape Drive
1. Determine which PMF CRU, IOMF CRU, or 6760 ServerNet device adapter
(ServerNet/DA) should be connected to the tape drive.
2. Unpack the tape drive module using the scissors or cutters.
3. Unload the tape drive module using the unloading ramp included with the unit.
4. Move the tape drive module into place.
5. Lower the legs on the pedestal using a 15/16-inch (24-mm) wrench.
6. Install the pedestal top panel and red corner caps.
7. Open the back panel of the 5175 tape drive.
8. Find the copper SCSI cable for the tape drive.
9. Connect the SCSI cable to the uncapped SCSI port at the rear of the tape drive.
Latch the clips.
Caution. System consoles are shipped with identical IP addresses. To avoid software errors,
specify a unique IP address for the backup system console before you connect the console to
the Ethernet switch or NonStop S-series server.
Note. Do not connect this cable to the cascade port on switch 1.
Title Page
Installing a 5175 Tape Drive
E-19
Installing a 519x Tape Drive E-21
Note. To perform a tape dump, connect the tape drive to a PMF CRU in groups 01 or 02.
Note. Ensure the tape drive CRU AC power switch is in the OFF (0) position.