
NonStop S-Series Hardware Installation and FastPath Guide (G06.29+)


FastPath Tasks: Required
HP NonStop S-Series Hardware Installation and FastPath Guide—541880-002
E-21
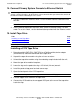
15. Install Tape Drive
Installing a 519x Tape Drive
1. Determine which PMF CRU, IOMF CRU, or 6760 ServerNet/DA should be
connected to each tape drive.
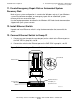
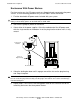
2. Unpack the 519x tape drive module using scissors or cutters.
3. Unload the 519x tape drive module using the unloading ramp included with the
unit.
4. Move the tape subsystem into place and lower the legs on the pedestal using a
15/16-inch (24-mm) wrench.
5. Remove foam packing from tape drives with an automatic cartridge loader (ACL).
6. If necessary, install the ACL and the cleaning cartridge.
7. Open and remove the rear bezel door of the tape drive module.
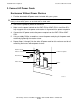
8. Find the copper tape subsystem SCSI cable:
9. Attach one end of the SCSI cable to the uncapped SCSI port at the rear of the tape
drive.
10. Depending on the model of your PMF CRU, attach the other end of the SCSI cable
either to the SCSI terminator covering the SCSI port on the PMF CRU as shown in
Step 10 on page E-20, or to the SCSI port itself:
•
S7000, S7400, S70000, and S72000 PMF CRUs have an external SCSI
terminator.
•
All other PMF CRUs contain an internal terminator, so you can attach the SCSI
cable to the SCSI port directly.
11. Connect the AC power cord for the tape drive.
12. Reinstall and close the rear bezel door of the tape drive.
Note. Make sure the tape drive CRU AC power switch is in the OFF (0) position.
Caution. On a S7000, S7400, S70000, or S72000 PMF CRU, do not remove the external
SCSI passthrough terminator from the differential SCSI port.