
NonStop S-Series Operations Guide (G06.27+)


Processors: Monitoring and Recovery
HP NonStop S-Series Operations Guide—522459-008
11-24
Copying a Dump File From Tape to Disk
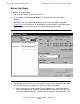
6. Type the RVU of the software you want to load in the SYSnn edit box.
7. Select the configuration file using the option buttons.
8. Click the CIIN disabled check box if you want to disable the CIIN file.
9. Type the disk information in the group, module, and slot boxes.
The $SYSTEM-P disk is located in group 1, module 1, slot 11. The $SYSTEM-M
disk is located in group 1, module 1, slot 12.
10. Select the ServerNet fabric, either fabric-X or fabric-Y, using the option buttons.
11. Click Load.
A warning dialog box appears if any processors are currently running, asking if you
want to continue with the operation. Otherwise, the system load begins, and this
dialog box is closed.
12. Select File>Start Terminal Emulator>For Startup TACL.
13. Select File>Start Terminal Emulator>For Event Streams.
Copying a Dump File From Tape to Disk
To copy a dump file from tape to a disk file in compressed format, use the
COPYDUMP utility. COPYDUMP automatically determines the size of the dump file.
To make a compressed disk copy of a dump file:
1. At a TACL prompt:
COPYDUMP { $tape | dumpfile }, destfile
where:
•
$tape is the name of the tape drive where the tape dump file is located.
•
dumpfile is the name of the disk dump file specified in the RECEIVEDUMP
or RCVDUMP command.
•
destfile is the destination disk file.
Caution. You cannot cancel a system startup from this dialog box once you initiate it.
Note. After you click Load, the load configuration is retained. The next time the Load
Processor From Disk dialog box is opened, the current load configuration data is
automatically filled in.
Note. To receive the startup TACL and startup events at a workstation, the workstation must
be authorized to receive the startup TACL and startup events using the OSM or
TSM Low-
Level Link.