
NonStop S-Series Planning and Configuration Guide (G06.28+)


Completing the Installation Plan
HP NonStop S-Series Planning and Configuration Guide—523303-020
13-9
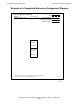
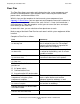
Floor Plan
Floor Plan
The Floor Plan allows you to plan and indicate where the system components and
furniture should be placed in your computer rooms relative to preinstalled cables,
power outlets, and communications lines.
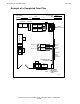
With this form and the templates for furniture and system components from
Appendix C, Blank Forms, you can represent each computer room and its contents to
scale. (These templates are drawn to the scale 1/4 inch = 1 foot—0.64 centimeter =
30.5 centimeters). Copy the templates so that you can cut out the items and attach
them directly to the Floor Plan.
Instead of this form, you can substitute a floor plan drawn to scale.
Make a copy of the blank Floor Plan for each room in which system equipment will be
installed.
Complete a Floor Plan as follows.
Task Comments
Enter a unique identifier for the building in
the Building field.
You can describe the building in any way
that is unique for your site. For example,
you can use the number assigned to the
building within the company.
Enter a unique identifier for the room in
the Room field.
You can describe the room in any way that
is unique for that building, such as a room
number or location.
Enter the name of the system in the
System Name field.
This system name must match the system
name on all other forms in this packet.
Draw an outline of the room to scale on
the Floor Plan.
Within the outline, indicate the
positions of:
•
AC power outlets
•
Communications lines
•
Any preinstalled I/O device cables
Indicate the positions of system
components using the system
components template.
These templates include the required
access space, but be sure to allow
adequate space for walkways as well.
Indicate the positions of furniture using
the furniture template.
Be sure to allow adequate space around
the furniture for walkways.
Indicate where the I/O device cables
are to be installed.
When you have completed this form,
enter the date in the Date field.