
NonStop System Console Installer Guide


TIP: Be sure to document where the file is to be archived.
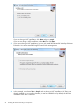
5. At “Completing the Backup or Restore Wizard,” click Finish to start creation of the backup
file. Upon completion, copy the saved file to a location off of the console.
NOTE: This will be a very large file. Consult Microsoft™ documentation for how to create
a shared folder and copy directly to another system console on the LAN.
Step 3 — Restore Settings and Data from the Archived File
For this step, perform the procedure described for either Scenario A or Scenario B:
• “Scenario A: Restore Data to a Console of the Exact Same Hardware Model” (page 59)
• “Scenario B: Restore Data to a Console with a Newer Hardware Model ” (page 59)
NOTE: In both scenarios, the console on which you are restoring the data must have Windows
Server 2003 already installed.
Scenario A: Restore Data to a Console of the Exact Same Hardware Model
1. On the destination console, start the Microsoft Backup program by selecting Start > All
Programs > Accessories > System Tools > Backup. Note that by default, Backup or Restore
starts in Wizard mode, unless it is disabled.
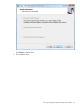
2. Click Next to start the Wizard mode. Select “Restore files and settings” and click Next.
3. Click the Browse button, select the folder containing the backup file to be restored and click
OK.
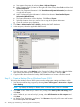
4. In the “What to Restore” dialog box, under “Items to restore,” click the plus sign next to the
word “File” and then next to the backup set .bkf file to expand the tree. Put a check mark
next to the expanded tree icons (i.e. the C: and “System State”), then click Next.
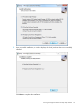
5. Click the Advanced button, then click Next. Click OK to dismiss the warning dialog that
“Restoring System State will always overwrite current System State unless restoring to an
alternate location.”
6. Choose Replace existing files and click Next, then Next again.
7. Click the Finish button to start the restore process.
8. Follow the on-screen directions.
Scenario B: Restore Data to a Console with a Newer Hardware Model
Perform these steps and then proceed to:
1. On the destination console, create a C:\Backup folder. From your archive, copy the
C:\Boot.ini file and the entire C:\Windows\Repair folder, including all subfolders, into
the C:\Backup folder.
2. Start the Microsoft Backup by selecting Start > All Programs > Accessories > System Tools >
Backup. Note that by default the Backup or Restore starts in Wizard mode, unless it is disabled.
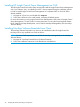
3. Click Advanced Mode on the Backup or Restore Wizard.
4. From the Tools menu, select Options. On the Restore tab, click Always replace the file on my
computer, then click OK.
5. From the Tools menu, select Restore Wizard.
6. Click Next. In the “What to Restore” dialog box, click the Browse button, locate and select
the backup file from the previous console, and click OK.
7. In the “What to Restore” dialog box, under the Items to restore, click the plus sign next to the
word “File” then next to the backup set .bkf file to expand the tree. Put the check mark next
to the expanded tree icons (i.e. the C:and System State) then click Next.
Backing Up and Restoring an NSC Running Windows Server 2003 59