
NonStop System Console Installer Guide

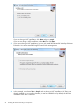


8. Click Finish to start the restore process.
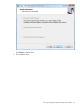
9. After the restore operation is complete -- but before you restart the destination computer --
follow these steps:
• Copy the Boot.ini file from the C:\Backup folder (that you created in Step 1 of
Scenario B) to C:\Boot.ini.
• Copy the Repair folder and its subfolders from the C:\Backup folder to the
C:\Windows\Repair folder.
10. Restart the console.
Step 4 — Restore Network Settings and Restore the DHCP Server
After the console restarts, the LAN configuration will not be restored correctly because there is new
or changed hardware. You must restore your network settings. To restore these settings:
1. Uninstall the ghosted network adapter from the registry.
a. From the Windows Start menu, select Run. Enter cmd.exe, then press ENTER.
b. Enter set devmgr_show_nonpresent_devices=1, then press ENTER.
c. Enter Start DEVMGMT.MSC, then press ENTER.
d. Select View, then Show Hidden Devices.
e. Expand the Network Adapters tree.
f. Right-click the dimmed network adapter and click Uninstall.
2. Use the Network Diagnostics information you created during “Step 1 — Save Network
Configuration Information” (page 57) to reconfigure the network adapters on the new system
console.
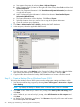
3. If the console is used as a DHCP server, restore the DHCP server by performing these steps:
a. Start the Windows Server 2003 Network Diagnostics program by selecting Manage Your
Server from the Windows Start menu.
b. In the “Manage Your Server” dialog box, click Add or remove a role.
c. Click Next. Select DHCP server from the Server Role list, then click Next.
d. Check the box next to “Remove the DHCP server role” and click Next.
e. When it completes, click Finish to exit.
f. In the “Manage Your Server” dialog box, click Add or remove a Role.
g. Click Next. Select “DHCP Server” from Server Role, then click Next.
h. Click Next. In the “New Scope Wizard” dialog box, click Cancel, then Finish.
i. In the “Manage Your Server” dialog box, under the “DHCP Server” heading, click Manage
this DHCP server.
j. In the tree pane, select the applicable DHCP server.
k. From the Action menu, select Restore. In the “Browse for Folder” dialog box, locate and
select the folder that contains the backup file of DHCP database you created earlier, then
click OK.
l. Follow the on-screen directions.
4. Restart the system console.
NOTE: For information on checking the status of DHCP, TFTP, and DNS services on the
dedicated service LAN, see Locating and Troubleshooting DHCP, TFTP, and DNS Services on
the NonStop Dedicated Service LAN located in the HP Integrity NonStop Troubleshooting Tips
section of NTL.
60 Backing Up and Restoring a NonStop System Console (NSC)