
ODBC Server Installation and Management Manual


Using the NonStop ODBC Server Configuration
Manager
HP NonStop ODBC Server Installation and Management Manual—429395-002
3-40
Step One: Configure Profiles
SOFTWARE.CORE4
SOFTWARE.CORE5
From the menu bar in the NonStop ODBC Server Configuration Manager main window,
choose the Configuration menu to display the list of configuration windows. You will be
performing these steps:
•
Configure Profiles
•
Add Users
•
Add the Net Service Configuration
•
Add the SCS Configuration
•
Configure the Server Classes
•
Add Smap configuration
•
Add Umap configuration
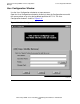
Step One: Configure Profiles
Configuration begins with the definition of one or more profiles, as follows:
1. Choose Profile from the Configuration menu in the main window.
2. Click the Add control tab in the Profile Configuration window.
a. Type PROFILE_CORE1 in the Profile field.
b. Click the Advanced button to open the Profile Advanced Configuration
subwindow.
c. Enter values for the following fields only (defaults will be used for all other
values):
d. Click the Close button on the Profile Advanced Configuration subwindow.
e. Click the Apply button.
f. Click NO for the Update System Configuration dialog.
g. Click OK for the SQL SUCCESS message.
3. Click the Add control tab again.
a. Type PROFILE_CORE2 in the Profile field.
b. Click the Advanced button.
Default_DB: MASTER
SQL Dialect: TDM_CORE