
ODBC Server Installation and Management Manual

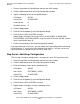


Using the NonStop ODBC Server Configuration
Manager
HP NonStop ODBC Server Installation and Management Manual—429395-002
3-47
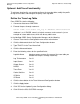
Step Six: Add Smap Configuration
2. Click the Search button.
3. Double-click on CLASSCORE1 in the list box.
4. Type CLASSCORE2 in the Serverclass field.
5. Click the Advanced button.
6. Change the Profile to PROFILE_CORE2.
7. Change the Guardian Name to SOFTWARE.CORE2.
All other attributes can remain the same as they were defined for server class
CLASSCORE1. You can modify them later, fine-tuning them to suit the needs of
the users.
8. Click the Close button in the ServerClass Advanced Configuration window.
9. Click the Apply button.
10. Click NO for the Update System Configuration dialog.
11. Click OK for the SQL SUCCESS message.
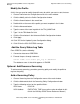
12. Repeat Steps 1 through 11, using the following values:
13. Again repeat Steps 1 through 11, using the following values:
14. Again repeat Steps 1 through 11, using the following values:
15. Click the Close button in the ServerClass Configuration window.
You now have five server class definitions. You can modify any of the attributes while
the system is running. The servers respond to any changes you make when
CHECK_INTERVAL_SECS in the system configuration table has expired and the client
disconnects.
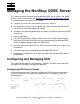
Step Six: Add Smap Configuration
At this time you need to map the server class definitions to the SCS.
Serverclass CLASSCORE3
Profile PROFILE_CORE3
Guardian Name SOFTWARE.CORE3
Serverclass CLASSCORE4
Profile PROFILE_CORE4
Guardian Name SOFTWARE.CORE4
Serverclass CLASSCORE5
Profile PROFILE_CORE5
Guardian Name SOFTWARE.CORE5