
ODBC Server Installation and Management Manual


Installing the NonStop ODBC Server
HP NonStop ODBC Server Installation and Management Manual—429395-002
2-30
ODBC Installation
message box with a description of the error. In that case, you should exit from SETUP,
fix the problem, and run SETUP again.
The following steps are performed by the HP ODBC SETUP program:
1. SETUP displays a welcome screen. Click Continue.
2. SETUP displays a menu of installation options from which to choose.
All options are selected by default. Click Continue.
3. Next, SETUP displays a box to select the directory to use. If you have a “C” disk
drive on your PC, click Continue to use the default (C:\ODBC). Otherwise, set the
disk name and click Continue.
4. SETUP now installs several files. During the process, it shows a “percent done”
bar. If any failures occur at this point, they are typically “out of space” or “access
violation” conditions.
If SETUP finds it is installing an older version of a file than is currently installed, it
prompts you for a decision about what to do (the default is not to install the older
version).
5. If the HP ODBC driver was installed, SETUP prompts you to configure it now or to
do it later with the ODBC Administrator (the default). Click Continue.
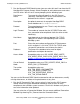
6. SETUP builds a Windows program group called “HP NonStop ODBC...” with
program items for the following (if they were chosen to be installed):
Finally, SETUP displays a “setup completed” screen with a summary of the version
installed.
HP ODBC SETUP keeps a log of the changes it makes, as well as detailed error
messages. The log is stored in a file named SETUP.LOG in the setup directory. It is
useful for debugging.
Component 16-bit Installation 32-bit Installation
Microsoft ODBC
Administrator
X X
Microsoft ODBC Spy X
Microsoft ODBC Test X X
Connectivity Tool X X
Configuration
Manager
X X
Debug Tool X X