
ODBC/MX Driver for Windows Manual (SQL/MX 2.x)

Installation of the ODBC/MX Client
HP NonStop ODBC/MX Driver for Windows—527888-004
2-3
Step 2: Install the Client Interface Components
Step 2: Install the Client Interface Components
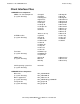
The InstallShield is a wizard that sequentially walks you through the steps to install the
client components on your client workstation. Use the following tables as a guide to
using each InstallShield screen:
Buttons Common
to Most Screens Description
Back
Next
Cancel
Displays the previous screen
Displays the next screen
Aborts the installation
Screen Button Description
Initial Setup Cancel Unpacks the installer files
Welcome Next
Software License
Agreement
Yes
No
Displays the next screen
Aborts the installation
Choose Destination
Location
Browse Selects the folder into which the ODBC files are copied.
The default location is:
C:\Program Files\Compaq\NonStop ODBC-MX 2.0
Setup Type Typical
Compact
Custom
Installs the most common options and displays the next
screen.
Installs minimum required options and displays the next
screen.
Choose the options you want to install.
Select Components
(displays only for
Custom Setup)
Next Selects the components to install:
•
ODBC-MX Driver
Select this option to install the ODBC/MX driver;
this option is required.
•
ODBC 3.51
•
ODBC 3.51 Core
Select this option to install the Microsoft ODBC
driver manager and other ODBC components.
•
ODBC Tools
Installs ODBC test.
•
Translator
Select this option if your application uses these
services.
Select Program
Folder
Enter the name of a subfolder within the Program folder.
The default is NonStop ODBC-MX 2.0.