OmniMessaging Provisioning Client User Guide OmniMessaging Provisioning Client User Guide Version 2.4 07/22/04 Opsol Integrators Inc.
OmniMessaging Provisioning Client User Guide 1 INTRODUCTION................................................................................................................................................4 2 BRINGING UP THE JAVA CLIENT ............................................................................................................4 2.1. 2.2. PREREQUISITE: ...........................................................................................................................................
OmniMessaging Provisioning Client User Guide 11 CONFIGURE NDR: ......................................................................................................................................35 12 SET ACCESS CONTROL...........................................................................................................................36 12.1. 12.2. 07/22/04 MAILBOX RIGHTS............................................................................................................................
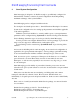
OmniMessaging Provisioning Client User Guide 1 Introduction This manual shall provide user information about how to configure and use the Java Provisioning Client interface for OMNI Messaging. 2 Bringing up the Java client 2.1. Prerequisite: JRE Version 1.3 (at least) should be installed on the PC. This can be obtained from http://java.sun.com/getjava/download.html 2.2. Steps: It is strongly recommended that the screen resolution be set to at least 1000*768 • • • • Unzip the OmniInterface.
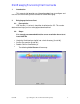
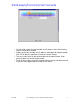
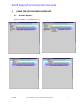
OmniMessaging Provisioning Client User Guide • On the Initial screen, the port number and IP address of the Provisioning listener should to be entered. • Make sure the port number and IP address correspond to the port number and TCP/IP process specified at install time for the listener. • The next screen asks for the authentication of the administrator. Enter guest for both user id and the password.
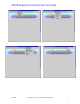
OmniMessaging Provisioning Client User Guide 3 Omni System Configuration Omni messaging is designed to be flexible enough to get efficiently configured for different kinds of business solutions. System Configuration should help making maximum advantage of the system facilities. Omni Messaging can be configured at different levels. For description and details please refer to “Omni3 Functional Description” document.
OmniMessaging Provisioning Client User Guide Default Domain Provided is “OmniOpsol.com” With the above configuration users and mail addresses could be created under the common Account “Proivisioning Id 1”. (Alternatively separate account can also be created and configured accordingly in ‘SystemFucntions/Settings’ tab In order to create an user please go to ‘User / Register User’ tab.
OmniMessaging Provisioning Client User Guide 4 USING THE PROVISIONING INTERFACE 4.1. Available Options: Options available to an administrator are- 07/22/04 Opsol Integrators Inc.
OmniMessaging Provisioning Client User Guide 07/22/04 Opsol Integrators Inc.
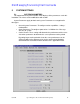
OmniMessaging Provisioning Client User Guide 5 SYSTEM SETTINGS 5.1. SYSTEM PARAMETERS This option from the System Functions menu displays all the parameters set for this installation. The values can be modified, but with caution. System Parameters apply to whole omni system. Parameters are categorized in three types • • • General System Parameters: To configure various capabilities / settings / functionalities. Quota Parameters: To configure quota values i.e. Mailbox size / Message Size etc. for system.
OmniMessaging Provisioning Client User Guide 5.2. FILTERS Filters are files created for particular domains and keywords, so that mails from the specified domains with the specified keyword(s) are directed to the specified queue file. One or more keywords can be specified for a Queue file and Domain Name . Creating a queue file for keyword ‘SMS=’(more than one keyword can be set)and domain = ‘hotmail.com’ and file name as ‘$omni04.hijinst.smshmail’ means that when a mail with rcpt to as SMS=12345@hotmail.
OmniMessaging Provisioning Client User Guide To create a file filter enter a server tag name (it is 0 by default when changing its value , it is necessary to have appropriate changes in the server configuration), double click on the required keywords from the list on the right, give a valid domain name. ‘DEFAULT’ refers to the default domain. Also a guardian filename of the format $Disk.volume.subvolume. Keywords can be added to the Queue file while creating it by 1.
OmniMessaging Provisioning Client User Guide Edit Keywords Edit Keywords allows editing the keyword list for a Server Tag–Queue File Name – Domain combination. The above screen lists all the server tags. Choosing on the required server tag will list the queue file names for the chosen server tag. On selecting a particular queue file, the corresponding domain names are displayed.
OmniMessaging Provisioning Client User Guide Delete Filter File There are two kinds of file delete 1. Deletes the configuration of the file for a particular domain: It will delete the configuration of the keywords for a particular file for a particular domain. 2. Deletes the file physically: specifying ‘All’ in the space for Domain Name does This will delete the configuration of keywords of the file from the database for all domains and clean up the file from the disc.
OmniMessaging Provisioning Client User Guide User Env : Allows setting of Account Name and Namespace Name, also the quota values. . Once set, the same values will be used unless changed. Relay Queue : RFE 6 SYSTEM FUNCTIONS 6.1. Service Package Different kinds of facilities can be decided to provide different levels of services. System administrator can configure the Service package or PLANS that can be opted by e-mail subscribers. Eg. Gold / Silver / Bronze 6.1.
OmniMessaging Provisioning Client User Guide Type in the name of the required service package, on submit, all the values of the service package are displayed if it exists else an appropriate error is thrown. 6.1.3 Delete Service Package Enter the service package name to be deleted and click on submit. 6.2. ACCOUNT An Account is omni messaging system unit of billing. 6.2.1 Add Account This screen lets the administrator add a new account under an existing service package.
OmniMessaging Provisioning Client User Guide Note: if Namespace Delimiter is not specified, it defaults to ‘#’. 6.2.2 6.2.3 07/22/04 Set Account Status Delete Account Opsol Integrators Inc.
OmniMessaging Provisioning Client User Guide 6.3. NAMESPACE Namespace provides the space for mail storage. One or more Namespaces should be created for each account. 6.3.1. Add Namespace This screen can be used to add a new namespace to an existing account. Give all the inputs and click ‘submit’ to send the request to server. Note: if Hierarchy Delimiter is not specified, it defaults to ‘/’. 07/22/04 Opsol Integrators Inc.
OmniMessaging Provisioning Client User Guide 6.4. Stop Process After selecting the node name and server type, all the processes active on given omni node and server type are listed.User can select process name from this list and submit the graceful stop request. User can select option “ALL” for all processes for given type of server. In this case all the processes running on given node for given server type are stopped gracefully. 07/22/04 Opsol Integrators Inc.
OmniMessaging Provisioning Client User Guide 7 DOMAIN 7.1. ADD DOMAIN To add a new domain on the add domain screen, enter the name of new domain (for e.g. omni.com) and click submit. A new domain will get added under the default account (with Id- ‘Provisioning Id 1’). Also implicitly postmaster email-id is added for that domain and the domain is activated. The default domain added during installation is omniopsol.
OmniMessaging Provisioning Client User Guide 7.2. EDIT DOMAIN: Enter the name of the domain to be edited on the first screen. The next screen will show existing settings for the domain and allow you to change them. 07/22/04 Opsol Integrators Inc.
OmniMessaging Provisioning Client User Guide You can choose to activate or deactivate the domain. Also the domain redirection status and the redirection domain can be changed. After modifying one or more fields click submit to execute the change. 7.3. DELETE DOMAIN: Enter name of the domain to be deleted and click submit to delete the domain. 07/22/04 Opsol Integrators Inc.
OmniMessaging Provisioning Client User Guide 8 USER 8.1. ADD USER: In add user screen for administrator, enter the login name and the password The node instances and the namespace Name, Account Name, maximum mail box size, maximum messages can be set for the user through Node Inst and User environ tabs respectively which are in the Options menu under System Settings. Click submit to add the user. A success/failure message is displayed based on the result of the operation.
OmniMessaging Provisioning Client User Guide To edit a user’s attributes, enter the Login User name on the first screen. Click continue to proceed The details of the user are fetched and displayed General Info- This tab displays the general information about the user. Quota- The quota values for the user are displayed in tab Node Instances – This tab lists out the nodes assigned to this user 8.3. DELETE USER: Enter the login User’s name to be deleted and click submit to actually delete the user.
OmniMessaging Provisioning Client User Guide 8.4. CHANGE PASSWORD To change password of a login user, on the change password screen enter the name of the user and the new password twice. When submit is clicked the password gets updated. 07/22/04 Opsol Integrators Inc.
OmniMessaging Provisioning Client User Guide 8.5. MANAGE EMAIL ADDRESS User can have one or more e-mail addresses. 8.5.1. Add Email Address This screen allows an admin to add an email address for existing login user. User name is the name of the login user for which an email address is to be added. Email address is the address in the format addr@domain-name.com 8.5.2. Edit Email Address On the first screen, enter the email address to be edited.
OmniMessaging Provisioning Client User Guide Displays the email information related to the give email address. Only the status of this email address can be changed The settings for the email address as well as the settings for the forwarding of the specified email id is obtained. On Selecting Enable Redirection = Yes, the administrator is allowed to set a redirection address for that email id. 07/22/04 Opsol Integrators Inc.
OmniMessaging Provisioning Client User Guide Auto Reply (Vacation Message) Vacation Message can be set for a particular email Id for a particular period of time. In this interface too only on Setting the Auto Reply Status id the administrator allowed to set the vacation message for the email address 07/22/04 Opsol Integrators Inc.
OmniMessaging Provisioning Client User Guide 8.6. POP Client 8.6.1 Add POP Client Add POP Client screen facilitates downloading mails from the INBOX of a remote mail server to the specified OMNI INBOX. To Add, the OMNI Userid, OMNI email address, remote userid, remote mail server’s IP address, remote account’s password and the polling interval for the mails (in seconds) must be input. The values get added on clicking the Submit button 8.5.2.
OmniMessaging Provisioning Client User Guide The screen below is shown with the details of the selected Pop Client account The values for “Remote Password” and “Fetch mails every” can be modified, and on submit, the selected Pop client gets updated. The Reset button allows you to set the values that were fetched initially from the Data Base. 07/22/04 Opsol Integrators Inc.
OmniMessaging Provisioning Client User Guide When clicking on the Delete button, the Pop client that is being displayed will be deleted. 9 DISTRIBUTION LISTS (Dlists) 9.1. ADD DLIST To add a new dlist, on the add dlist screen, enter the name of the new distribution list, eg(dlist@domain.com) and the name of the account to which the domain belongs. When ‘submit’ is clicked, the request is sent to the server and the result returned by the server is displayed to the user. 9.2.
OmniMessaging Provisioning Client User Guide To add redirection addresses (members) to a dlist specify the dlist name and the name of the domain to which the dlist belongs on the edit dlist screen.another next screen. To add a new member (redirection address), enter the redirection address to be added in the textbox for add and click ‘add’ button. When add is pressed the request is sent to the server and the result of the operation is displayed in a dialog box. 9.3.
OmniMessaging Provisioning Client User Guide 10 BLACKLIST: 10.1. Manage Spam: Manage Spam facilitates blocking of a IP Address or Domain or a user for a particular domain. The domains that exist for the IP are listed against the Domain Name. Choose the appropriate domain name against which the entity is to be blacklisted. Then choose the type of the entity to be blacklisted for the chosen domain(Ip/Domain/User) 07/22/04 Opsol Integrators Inc.
OmniMessaging Provisioning Client User Guide Add/ Delete entries of the chosen entity type to the list. To add blacklist entries for the System, choose System from the Domain name List, and the entity to be blacklisted , then add or delete from the list 10.2. BLOCK SENDER: For an email id only another email address can be blocked(not a domain or IP address) Enter the email address for which other email address(es) are to be blacklisted, and submit .
OmniMessaging Provisioning Client User Guide 11 CONFIGURE NDR: On the configure NDR screen, an administrator is allowed to change the subject and text of any of the configurable NDRs in the system. There are six types of NDRs that can be altered. They areNDR_MAILBOX_FULL NDR_MSG_TOO_LARGE NDR_REDIRECTED_RECIPIENT_ERROR NDR_INVALID_REVERSE_PATH NDR_SMTP_RELAY_ERROR NDR_USER_NOT_FOUND To view/edit any type of NDR, click on the required type in the NDR_Type listbox. The existing subject and text will appear.
OmniMessaging Provisioning Client User Guide 12 Set Access Control 12.1. MAILBOX RIGHTS To view/edit mailbox rights, on the first screen- first field, enter name of the user who owns the mailbox in question. In the second field, enter the mailbox name for which the rights are to be viewed/modified. The third field is optional. Its the name of the granting user name- the user to which rights would be granted. Granting user name can be either 1> 0 indicating that rights are to be set for the owner.
OmniMessaging Provisioning Client User Guide If an ACL record does not exist, all the values are displayed as ‘set’. The next screen then looks something as follows: On this screen, the administrator can change any of the existing rights or set new rights by choosing set or unset for each of the rights. Click ‘submit’ button to send the request to the server and view result. 07/22/04 Opsol Integrators Inc.
OmniMessaging Provisioning Client User Guide 12.2. SET ACCOUNT RIGHTS This screen can be used to grant/revoke one account, access to a namespace owned by a different account. Owning account is the account of which a namespace is being shared with another account. Owning namespace is the namespace being shared. Granting account is the account which gets or is denied access to the owning namespace. Granting namespace name is the name with which the granting account will access the namespace.
OmniMessaging Provisioning Client User Guide Instructions to bring up the provisioning system : 1> SQLCOMP the Provserver, Listener and translator objects. The names of the objects are$..PROVSRV $..LISTNR $..XLATOR 2> To bring up the listener, translator and PROV server classes: a. Through pathcom for the OmniMessaging pathmon, obey srvcfg. For e.g: >pathcom $pnim2 ($pnim2 is the OmniMessaging pathmon name) =o srvcfg b.
OmniMessaging Provisioning Client User Guide listener serverclass. 07/22/04 Opsol Integrators Inc.