
OSF DCE Administration Guide--Introduction
OSF DCE Administration Guide—Introduction
2. Type y and press <RETURN> if you are reinstalling all components. Entering y is
equivalent to choosing REMOVE from the DCE Main Menu.
After you answer the prompt, dce_config continues the installation.
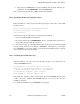
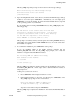
7.2.2.2 Specifying the Message Catalog Location
During installation, you may receive the following prompt for the location of the DCE
message catalogs:
Enter the directory into which message catalogs
should be stored on the local machine
(/usr/lib/nls/C):
You will receive this prompt under any of the following conditions:
• If you are installing DCE for the first time
• If you have used the dce_config REMOVE option to stop DCE daemons and remove
any data files associated with those daemons.
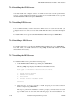
To answer this prompt, type the full pathname name of the directory in which the DCE
message catalogs should be stored and press <RETURN>. Alternatively you can simply
press <RETURN> to accept the default. Note that the actual default directory depends
on the operating system on your machine.
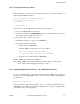
7.2.2.3 Verifying the zoneinfo Directory
During installation, you will receive the following prompt if your machine has an
existing /etc/zoneinfo directory:
The DCE version of the zoneinfo data files has been
installed in /opt/dcelocal/etc/zoneinfo. You may need
to replace /etc/zoneinfo with a link to this directory
for the DCE time component to work correctly.
Press <RETURN> to continue, CTRL-C to exit:
This prompt is to remind you that you must replace the existing zoneinfo directory with
a link to the newly installed DCE zoneinfo directory. You can do this after the
installation completes.
To continue the installation, press <RETURN> at the prompt.
7− 6 Tandem Computers Incorporated 124244